A dripping faucet almost always comes down to one worn part inside the handle: a rubber washer on an older two-handle faucet, or a cartridge, ball, or ceramic disc on a newer one. Most dripping faucet repair jobs take under an hour once you shut off the water, pull the handle, and swap that one part for its exact match.
A faucet that won't fully shut off is one of the most common calls a residential plumber gets, and also one of the easiest repairs a homeowner can do without any special tools. The dripping itself is rarely the real problem. It's a signal that one small part inside the handle assembly, usually a rubber washer, a cartridge, or a set of ceramic discs, has worn past the point where it can seal against water pressure. That part fails on a predictable schedule: friction and mineral buildup wear it down every time you turn the handle, so a faucet that gets heavy use in a kitchen or a kids' bathroom tends to start dripping years before one in a rarely used guest bath.
This guide walks through how to tell which kind of faucet you have, how to diagnose which part failed, the repair steps for each type, what it costs when you'd rather not do it yourself, and when a drip is actually a sign of something bigger than a faucet. If it turns out your problem is a toilet that won't stop running instead, our running toilet guide covers that fix, which takes about the same amount of time. If you already know you have a two-handle faucet, skip straight to the compression faucet repair steps below.
Why Your Faucet Keeps Dripping
Almost every dripping faucet traces back to one of five things, and they are not equally common. In order of how often each one turns out to be the actual cause:
A worn washer, cartridge, or O-ring. Every time you turn a handle, rubber and plastic parts inside compress against a metal seat. That friction, plus whatever minerals are in your water, wears the part down until it can no longer form a tight seal. This is the cause behind the large majority of dripping faucet repair calls.
A scored or pitted valve seat. On older compression faucets, the metal seat the washer presses against can develop grooves from years of grit passing through, so even a brand-new washer won't seal against it.
Water pressure that's higher than the fixture was designed for. A faucet that drips from more than one location at once, or drips harder right after the water heater cycles, sometimes points to house pressure running above what the fixture is rated for. Most homes run 40 to 80 psi at the supply, and plumbing codes generally require a pressure-reducing valve once static pressure tops 80 psi, since anything higher wears out washers and cartridges throughout the house, not just at one faucet. A plumber can check it with a gauge on an outside spigot in a few minutes.
Mineral buildup inside a cartridge or ceramic disc. Hard water leaves scale on the moving surfaces inside a cartridge, so it stops seating flush even though nothing is technically broken. If the same faucet also feels weak when it's running, not just dripping when it's off, our low water pressure guide covers that overlap.
A part installed wrong the last time someone worked on it: a washer sized slightly off, a cartridge from a different generation of the same faucet line, or a packing nut left a quarter-turn too loose will all produce a drip that looks identical to normal wear.
Kitchen faucets and whichever bathroom the kids use tend to drip first, simply because they get turned on and off the most. A guest bathroom faucet can go years without a problem for the same reason.
Figuring Out Which Kind of Faucet You Have
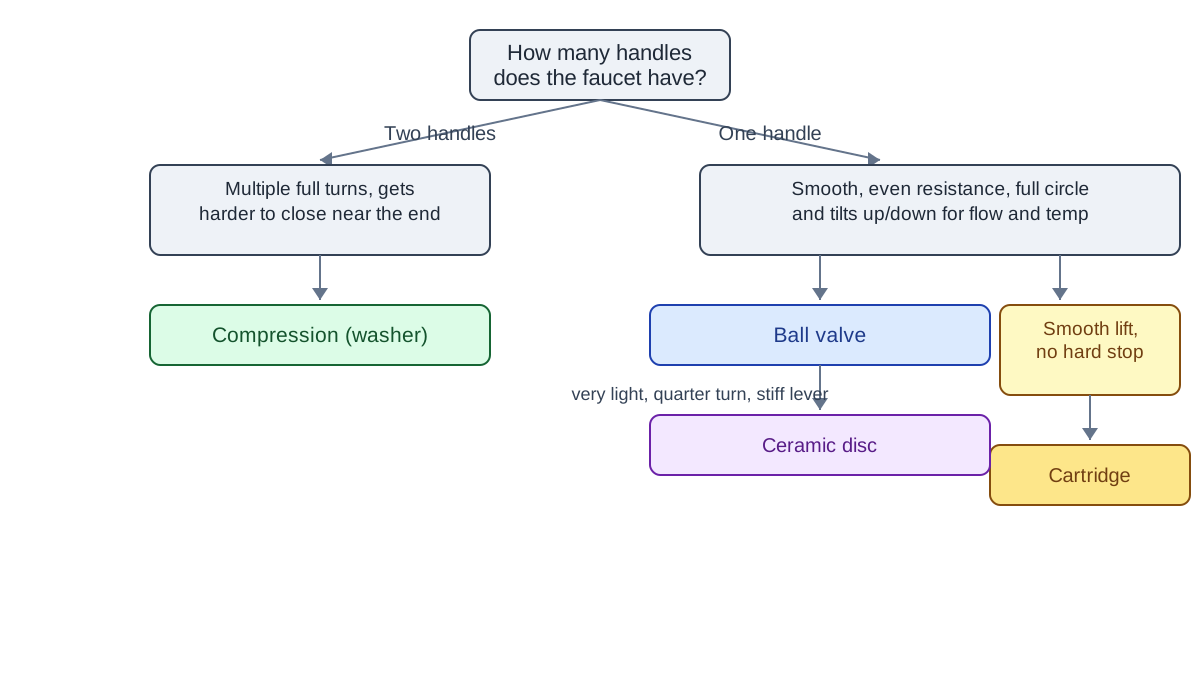
Before you buy a repair kit, you need to know which of the four common mechanisms you're dealing with, because the part that fixes one type does nothing for another. The fastest way to tell is by how the handle behaves, not by looking at the faucet's finish or shape.
Type
Handles
How the handle feels
Typical fix
Compression
Two (hot/cold)
Multiple full turns, gets noticeably harder to close near the end
Washer, O-ring, or reseating the valve
Cartridge
One or two
Smooth, consistent resistance through the whole turn, no hard stop
Full cartridge replacement
Ball
One (common on older single-handle kitchen faucets)
Handle moves in a full 360-degree circle and tilts up and down
Ball, springs, and seat kit
Ceramic disc
One or two
Very light, quarter-turn action (about 90 degrees of travel), stiff lever feel
Disc cartridge replacement
How to tell which faucet mechanism you have before buying parts.
If you're still not sure after handling it, pull the handle off (usually one screw under a decorative cap) and look at what's underneath. A compression stem has visible threads and a rubber washer at the bottom. A cartridge is a sealed cylindrical unit that lifts straight out. A ball mechanism has a slotted metal or plastic ball with two small rubber seats and springs beneath it. Whichever one you find, our brand-by-brand fixture repair guide has model-specific notes once you know the type.
Before You Touch Anything: Shut Off the Water
Every repair below starts the same way. Reach under the sink, or for a tub or shower valve, find the dedicated stop valves, often behind an access panel on the opposite wall, and turn the hot and cold supply valves clockwise until they stop. Then open the faucet handle to bleed off the pressure and confirm the water is actually off before you take anything apart.
Always shut off the water supply at the stop valves and relieve the pressure by opening the handle before you remove a single screw, since a stem or cartridge under full house pressure can blow out and soak a cabinet in seconds.
If the stop valves won't turn, or turn but the drip doesn't stop, don't force them. An old valve that's seized can snap off in your hand, and that turns a simple evening project into a flooded cabinet. If a valve won't fully close or you're getting water where you shouldn't, call 888-854-0126 and describe what's happening before you go any further.
Lay a towel in the sink or tub to catch small parts and protect the basin finish, and take a phone photo of the assembly before you disassemble it. That photo is the fastest way to get every washer and clip back where it came from.
Fixing a Two-Handle Compression Faucet
A compression faucet is the classic two-handle style found in older kitchens and most tub and shower valves, and it's the type most homeowners can fix start to finish with an inexpensive multi-pack of washers and O-rings and the hand tools already in a kitchen drawer.
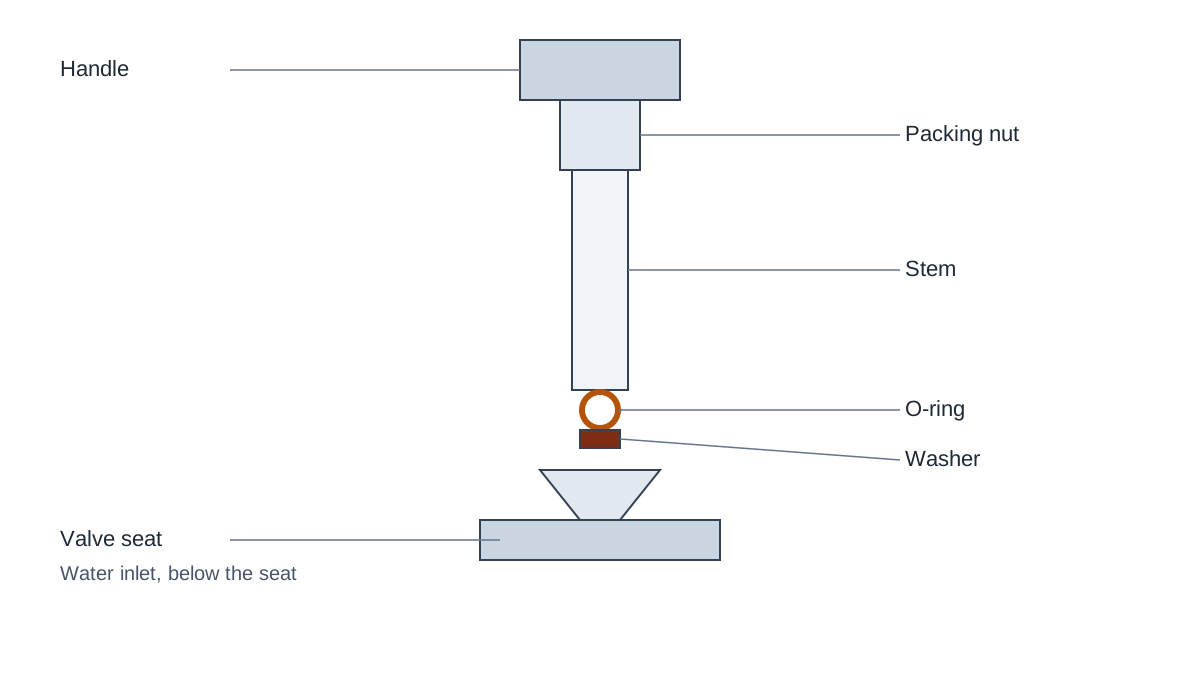
The parts inside a compression faucet stem, from the handle down to the valve seat.
Shut off the water and open the handle to relieve pressure, as above.
Pry off the decorative cap on the handle, remove the screw underneath, and lift the handle straight up.
Use a wrench to unscrew the packing nut, the collar that seals around the stem, then unthread the whole stem assembly counterclockwise.
Look at the bottom of the stem. Remove the brass screw holding the rubber washer and pull the old one off.
Match the old washer's size and shape exactly (flat, beveled, or the older style) and press the new one on, using the original screw or its replacement.
Check the O-ring higher up on the stem for cracking or flattening and swap it while everything's apart, since it's a much smaller job now than a second visit later.
Thread the stem back in, reattach the packing nut, and turn the water back on slowly while watching for leaks around the stem before you replace the handle.
This is the repair a faucet washer replacement kit is built for. If the drip continues after a fresh washer and O-ring, the valve seat underneath is likely scored, and you'll need a seat wrench to remove and replace it, or a seat-dressing tool to resurface it in place, both inexpensive and sold at the same hardware store.
Fixing a Cartridge, Ball, or Ceramic-Disc Faucet
A cartridge faucet repair looks different from a compression fix. Instead of a small rubber washer, you're pulling a sealed cartridge, ball assembly, or ceramic disc unit out as a whole and putting in an exact replacement, no resurfacing or resizing involved.
Shut off the water and relieve pressure as above.
Remove the handle (cap, screw, then lift or pull straight off depending on the model).
Unscrew or unclip the retaining collar, the nut or clip that holds the cartridge or ball in place.
Pull the cartridge straight up with pliers if it's stuck (mineral deposits often glue it in place), or lift out the ball, springs, and rubber seats.
Take the old part to the hardware store, or match it against the manufacturer's part number, to buy the exact replacement. Cartridges are not universal even within the same brand.
Set the new cartridge in the same orientation as the old one, since most have a flat side or notch that lines up with a slot in the faucet body.
Reassemble, turn the water back on slowly, and run hot and cold for a minute to clear any grit before you consider the job done.
Still dripping after you replaced the cartridge?
This is a common enough complaint that it's worth its own note. Three things cause it almost every time: the new cartridge is the wrong part number for that specific faucet generation, since manufacturers change cartridge design over the years even within the same faucet line; the retaining clip or collar isn't fully seated so the cartridge can't compress all the way; or the O-rings on the cartridge body weren't lubricated with silicone grease before installation and are binding. Pull it back out, confirm the part number against the faucet's model number, and check that the clip is fully clicked or threaded into place.
A Leaky Outdoor Faucet Is a Different Repair
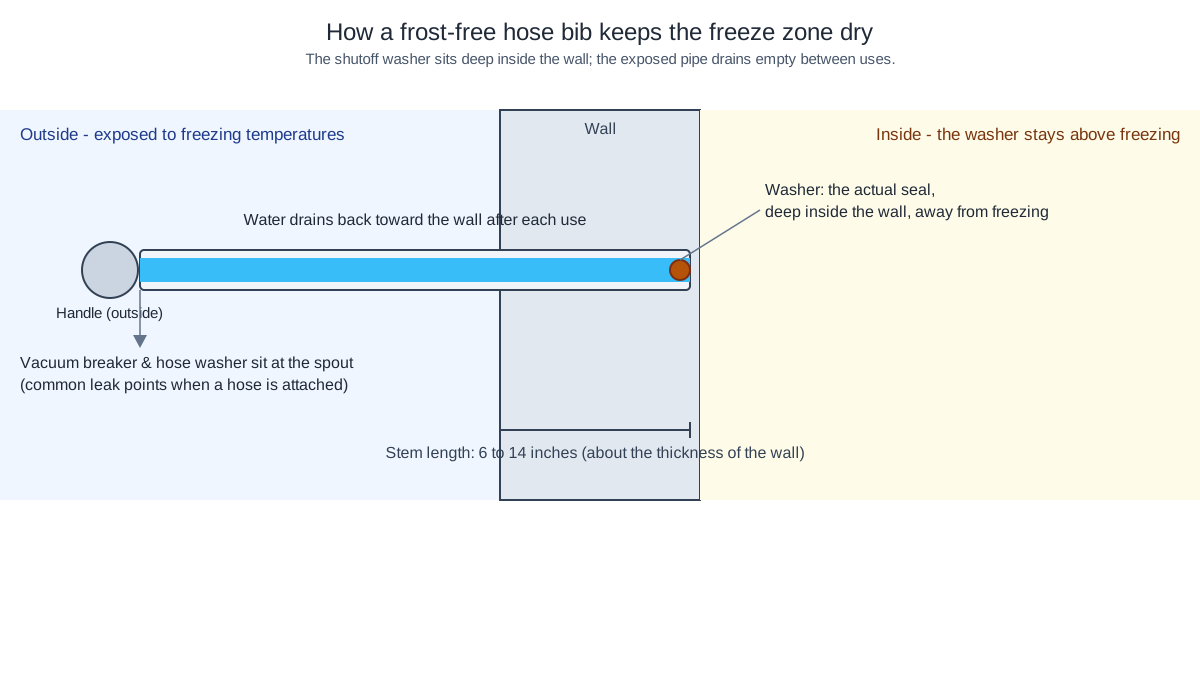
An outdoor spigot, or hose bib, uses the same washer or cartridge principle as an indoor compression faucet, but two things make it its own category. Most hose bibs are frost-free, meaning the actual shutoff washer sits a foot or more back inside the wall, out of the freeze zone (frost-free stems commonly run 6 to 14 inches long to match the wall thickness), so the visible handle you turn is really operating a long stem. And a hose bib that only drips when a hose is attached usually isn't the washer at all, it's the rubber vacuum-breaker or the hose washer, both cheap parts sold separately from a full repair kit.
If an outdoor faucet drips no matter what's attached, the fix follows the same compression-faucet steps above: shut off the dedicated interior valve for that spigot if the house has one, remove the long stem, and replace the washer at the far end. If there's no dedicated interior shutoff, you'll need to shut off the main house valve for the length of the repair.
The washer on a frost-free spigot sits deep inside the wall, so the exposed pipe can drain empty between uses instead of freezing.
Moen, Delta, and Kohler: What's Actually Different
The repair steps above apply across brands, but the part itself is proprietary. A Moen cartridge, a Delta cartridge or ball assembly, and a Kohler ceramic-disc cartridge are not interchangeable with each other, and using a close-but-wrong part is one of the most common reasons a fresh repair still drips. A few brand patterns worth knowing:
Moen single-handle kitchen and bathroom faucets have used the same general family of cartridges for decades, which is why Moen parts are often the easiest to find off the shelf at a hardware store rather than special order. A dripping Moen faucet repair is usually a same-day fix for that reason.
Delta uses both ball-valve and cartridge designs depending on the faucet line and era, so confirm which mechanism you actually have from the table above before ordering a part.
Kohler ceramic-disc faucets are common in mid-range and higher-end lines, and the disc cartridge is usually the single most expensive individual part in a faucet repair, though still far less than replacing the whole fixture.
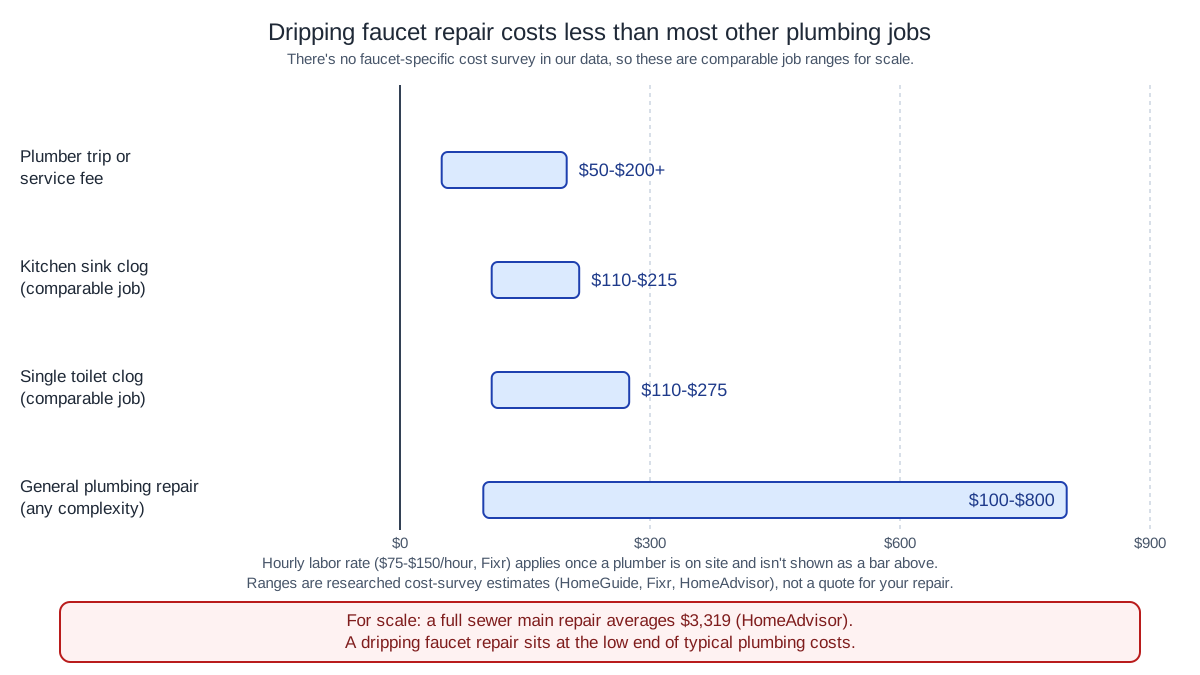
There's no dedicated national cost survey for faucet washer or cartridge replacement in the data we track, so treat any specific number you see quoted elsewhere with some skepticism. Every faucet repair cost breaks into two pieces: the part, and the labor if you're not doing it yourself.
The part itself is inexpensive almost regardless of type. A washer and O-ring multi-pack, a single OEM cartridge, or a ball-and-seat kit are all small hardware-store and plumbing-supply purchases, not a major expense on their own. What actually determines your total is whether you pay for a service call.
If you call a plumber instead of doing it yourself, you're paying for their time under whatever structure your local company uses, most commonly a trip or diagnostic fee plus an hourly or flat rate for the work itself. Two general plumbing-service cost surveys in our data give a sense of that structure, even though neither is faucet-specific, alongside two comparably small single-fixture jobs for scale:
Cost component
Typical range
Source
Plumber service or trip fee
$50 – $200+
HomeGuide, main sewer line cleaning cost survey
Plumber hourly rate
$75 – $150 / hour
Fixr, sewer line cleaning cost survey
Comparable small job: kitchen sink clog
$110 – $215
HomeAdvisor, clogged drain cost survey
Comparable small job: single toilet clog
$110 – $275
HomeAdvisor, clogged drain cost survey
A faucet washer or cartridge swap is usually faster than either comparison job once a plumber is on site, often finishing within the minimum trip charge if it's the only thing on the visit. For scale, general plumbing repairs of any kind span roughly $100 to $800 depending on complexity (HomeGuide's broader drain-cleaning cost survey), and a full sewer main repair averages $3,319 (HomeAdvisor) – a faucet repair sits at the low end of that spectrum, closer to a plumber's minimum trip charge than to either of those bigger jobs. Ask for a written, itemized estimate before work starts so the trip fee, labor rate, and part cost are broken out separately instead of bundled into one number.
How we got these numbers: our data pack doesn't include a cost survey specific to faucet repair, so this table uses general plumber service-call and hourly-rate figures, two comparably small single-fixture jobs, and two larger jobs for scale, drawn from five independent cost surveys. These are researched ranges pulled from the cited surveys above, not a quote for your job, and what you actually pay varies by region, how accessible the shutoff and stem are, and what the plumber finds once the packing nut or retaining collar is open. These ranges are national; use them to sanity-check a local quote, not to predict one, since only a written estimate from a plumber who's actually looked at your faucet is binding on price and scope.
A dripping faucet repair costs closer to a plumber's minimum trip fee than to a bigger job like a sewer main repair, based on HomeGuide, Fixr, and HomeAdvisor cost surveys.
When to Call a Plumber Instead of DIY-ing It
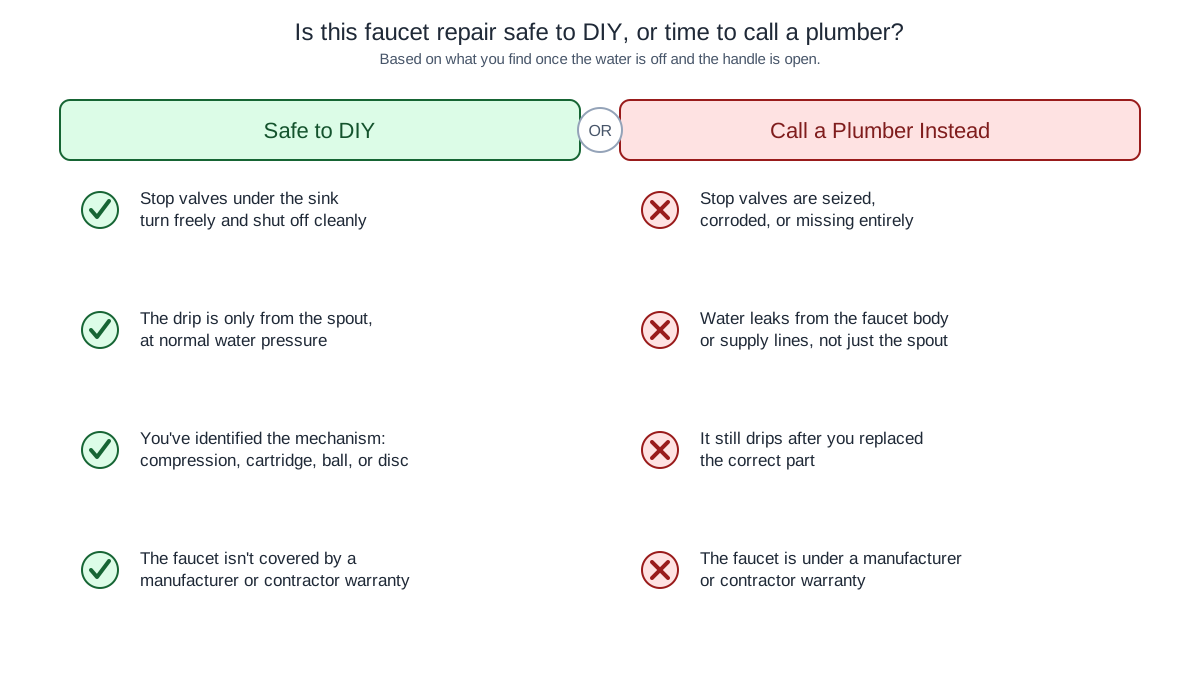
Most dripping faucet repair jobs are within reach for anyone comfortable with a wrench and an hour of patience. A few situations call for a professional instead:
The stop valves under the fixture are seized, corroded, or missing entirely. Forcing a valve that hasn't moved in twenty years is how a simple repair turns into a supply-line failure, which is what our pipe burst under the sink guide covers.
Water is coming from somewhere other than the spout, such as around the base of the faucet body or from under the sink at the supply lines, which usually means a worn supply-line connection or a cracked faucet body rather than a simple internal part.
You've replaced the correct part and the faucet still drips, which usually points to a scored valve seat, a damaged faucet body, or a fixture old enough that replacement parts are no longer made.
The faucet is original to a recent remodel and still under a manufacturer or contractor warranty, since a DIY repair can void that coverage depending on the terms.
In any of those cases, you can reach a plumber that serves your area at 888-854-0126 and describe the symptoms, which handle, how it feels when you turn it, what you've already tried, so they can bring the right cartridge or seat kit on the first visit instead of a second trip. For how to vet whoever you call, our guide to choosing a licensed plumber covers how to verify their license and confirm they carry current liability insurance before work starts, plus the red flags worth walking away from.
Use this split to decide whether to keep going with a DIY repair or stop and call a licensed plumber.
Keeping It From Dripping Again
Hard water speeds everything up
In areas with hard water, mineral scale builds up on washers, cartridges, and valve seats faster than in areas with soft water, which shortens the interval between repairs regardless of faucet quality. A whole-house water softener or a simple in-line filter won't stop mineral wear entirely, but it slows it, and periodically working each faucet handle through its full range, rather than leaving one tap untouched for years, keeps deposits from locking a part in place.
Older housing stock means older mechanisms
An older house is more likely to still have original compression faucets with metal valve seats that can be resurfaced rather than replaced outright, which is often the cheaper repair path once you're past the washer stage. A newer home is more likely to have cartridge or ceramic-disc faucets throughout, which means every future repair is a straightforward part swap rather than a resurfacing job.
Freeze-prone regions add a seasonal risk
In climates that see hard freezes, an outdoor spigot that isn't the frost-free type, or one where the interior shutoff was left open over winter, is a common source of a spring leak that looks like a simple drip but is actually a cracked pipe inside the wall from ice expansion the season before, since water expands roughly 9 percent in volume as it freezes, and once standing water in a pipe drops to 32 degrees Fahrenheit and turns solid, that expansion has nowhere to go but out through the weakest joint. Draining and shutting off exterior hose bibs before the first freeze, and disconnecting hoses so water can't sit in the line, is the cheapest prevention available. For the rest of the house's freeze risk, see our frozen pipe guide.
A quick monthly habit helps everywhere: run each faucet handle fully hot and fully cold, all the way open and closed, instead of leaving it at a comfortable half-open setting day after day. Full range of motion keeps internal parts seated correctly and surfaces a starting drip while it's still a five-minute fix instead of a bigger one, part of the same seasonal walk-through that catches a slow leak before it becomes a repair bill.
Frequently asked questions
How do I fix a dripping faucet?+
Shut off the water supply under the fixture, then open the faucet to relieve pressure. Remove the handle, pull out the stem or cartridge, and replace whichever part is worn: a rubber washer on an older two-handle faucet, or a cartridge, ball, or ceramic disc on most single-handle faucets. Match the replacement part exactly to your faucet's brand and model before reassembling.
Why is my faucet dripping?+
Almost always because a part inside the handle, most often a washer, cartridge, or O-ring, has worn down from repeated use and mineral buildup and can no longer form a tight seal against water pressure. Less often it's a scored valve seat, house water pressure running high, or a part installed incorrectly during a previous repair.
What causes a kitchen faucet to drip?+
Kitchen faucets get turned on and off more than almost any other fixture in the house, so the washer, cartridge, or ceramic disc inside wears out faster there than anywhere else. Hard water, high house pressure, and an aftermarket part that doesn't seat quite right all speed up the same wear.
What causes a bathroom faucet to drip?+
The same worn washer, cartridge, or O-ring that causes a kitchen faucet to drip, just on a slower timeline in a bathroom that gets less use. A bathroom faucet used by kids tends to drip sooner than one in a rarely used guest bath, since the handle gets cycled harder and more often.
How much does a dripping faucet cost to fix?+
The replacement part itself, a washer, cartridge, or seat kit, is inexpensive at any hardware store. If you hire a plumber, expect a trip or diagnostic fee plus an hourly rate, similar in structure to other small single-fixture repairs. Ask for a written estimate that separates the trip fee, labor, and part cost.
Can a dripping tap be repaired, or do I need a whole new faucet?+
Almost every dripping tap can be repaired by replacing the worn internal part rather than the whole fixture. Full replacement only makes sense when the faucet body itself is cracked, corroded beyond a clean repair, or old enough that no compatible replacement parts are made for it anymore.
Why is my faucet still dripping after I replaced the cartridge?+
Usually one of three things: the replacement cartridge is the wrong part number for that faucet's specific generation, the retaining clip or collar isn't fully seated, or the O-rings on the new cartridge weren't lubricated and are binding. Pull it back out, confirm the exact part number, and check that the clip is fully locked in place.
Why does my faucet drip only at night?+
It probably drips during the day too, but the house is quiet enough at night that a faucet dripping at night is the only sound in the room, which makes it noticeable. Nothing about darkness changes the mechanism; it's the same worn part doing the same thing, just easier to hear.
How much does it cost to replace a faucet entirely, versus repairing it?+
Our data doesn't include a faucet-replacement-specific cost survey, so we won't guess a number here. As a rule of thumb, full replacement runs well beyond a repair once you add the fixture itself, supply line work, and installation labor, which is why most plumbers try the repair first unless the faucet body is damaged.
Can I fix a leaky outdoor faucet the same way as an indoor one?+
Mostly yes: it's usually the same washer or cartridge repair, just at the far end of a longer stem on a frost-free hose bib. The differences worth checking first are the vacuum breaker and hose washer, both common leak points on an outdoor spigot that don't exist on an indoor faucet.