Here's how to dry out water damage yourself: stop the source, pull out standing water fast, remove anything too soaked to save, then run air movers and a dehumidifier around the clock until a moisture meter reads dry, within the EPA's 24-to-48-hour window. That works for small, clean-water spots; anything contaminated, over about 10 square feet, or still wet past 48 hours needs a professional.
A washing machine hose lets go while everyone's asleep, or a summer storm finds a gap in the flashing, and by morning there's a dark patch spreading across the ceiling. The first question most homeowners ask isn't who to call, it's whether they even need to. Plenty of water damage is genuinely a do-it-yourself job: a small, clean-water spill caught within a few hours rarely needs a truck full of equipment.
This guide walks through how to dry out water damage yourself, step by step, using the same category-and-class framework restoration technicians use to judge a loss, and the same 24-to-48-hour window the U.S. Environmental Protection Agency cites as the point mold starts to take hold. You'll find the actual drying sequence, how to dry wet walls and a wet subfloor without doing more harm than good, what fans and a dehumidifier can and can't fix on their own, and the specific signs that mean it's time to stop and call a professional instead.
What "Drying Out" Water Damage Actually Means
"Drying out" doesn't just mean the carpet feels dry to the touch or the puddle on the kitchen floor is gone. In restoration terms, a material is dry when it reads back to its normal, unaffected moisture content on a moisture meter, not when it looks dry, since drywall and subfloor can hold moisture for days after the surface feels fine. Restoration crews call that target the dry standard, the moisture level a material read before the loss, and it's the real finish line for any drying job, DIY or professional.
That distinction is the whole reason DIY drying jobs go wrong: people stop running fans the moment a room looks presentable, and the wall cavity behind it is still wet. The U.S. Environmental Protection Agency advises drying water-damaged materials within 24 to 48 hours to keep mold from taking hold, and FEMA puts a number on how fast the damage adds up in the first place: a single inch of standing water can cause roughly $25,000 in damage to a home. If water is still actively coming in right now, stop reading long enough to shut off the source, and if you can't find it or stop it, call 888-407-9931 and describe what you're seeing.
Nationally, water damage and freezing accounted for 27.6% of homeowners insurance losses in 2022, more than fire, which is part of why insurers and restoration companies alike treat the first hours after a leak as the part that decides the final bill.
Category and Class: What You're Actually Drying Out
Before you decide whether to reach for a wet-vac or a phone, it helps to know which kind of water you're dealing with. The IICRC S500 standard, the industry reference for professional water damage restoration, sorts every loss by category (how contaminated the water is) and class (how much of the structure absorbed it and how hard that makes drying).
Category 1 is clean water: a supply line, a fresh water heater failure, an overflowing sink with no soap or waste in it. This is the category most DIY drying jobs fall into, and the one where fans, a dehumidifier, and patience genuinely work. Category 2, sometimes called gray water, comes from sources like a washing machine or dishwasher discharge, or a sump pump backup; it can carry some contamination and calls for gloves and more caution, though a small spill is still often manageable. Category 3, black water, means sewage, floodwater, or water that's been sitting long enough to grow bacteria, and the EPA and IICRC both treat this as a job for trained crews with the right protective equipment, not a homeowner project.
Class works alongside category to describe how much material got wet and how easily it gives that moisture back up: Class 1 affects a small area with low-absorption materials, Class 2 involves a whole room and some absorption into carpet or lower walls, Class 3 means water came from overhead and soaked ceilings, insulation, and walls, and Class 4 means dense materials like hardwood, plaster, or concrete trapped moisture deep enough to need specialty drying. Our full water damage categories and classes guide breaks each one down further. For the purposes of this guide, Category 1, Class 1 or 2 is the sweet spot for doing this yourself.
Is This a DIY Job? A Quick Diagnosis
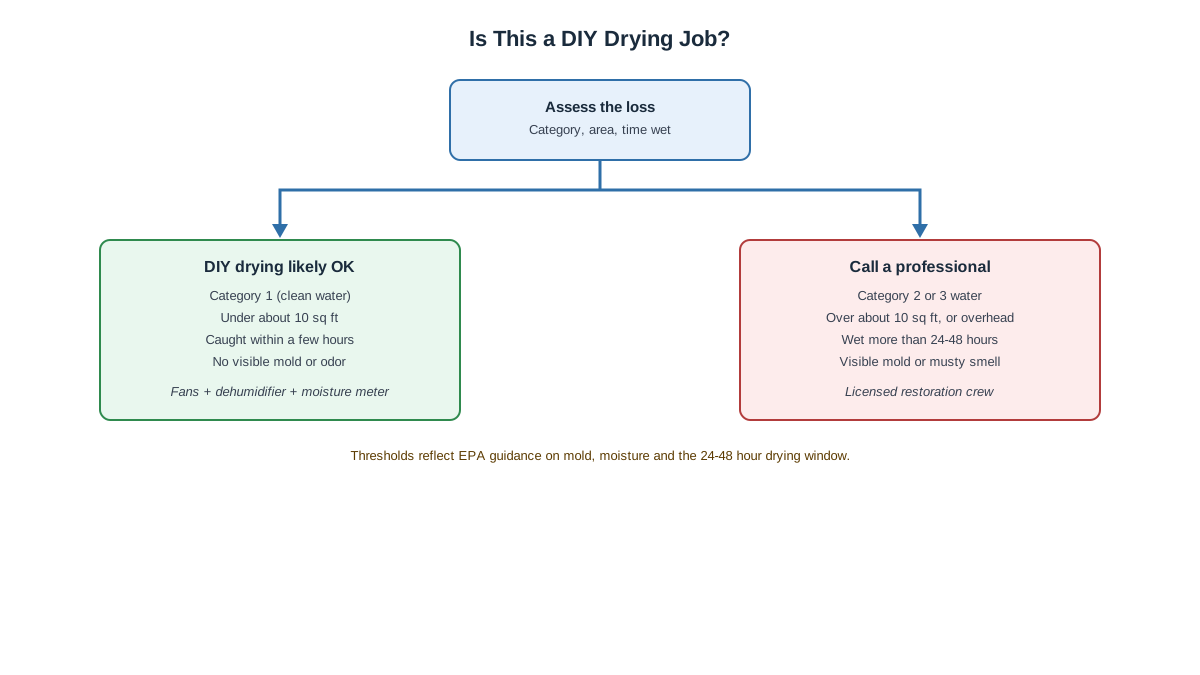
Use the water's category, area, and time wet to decide whether this is a DIY job.
Before you set up a single fan, walk the affected area and answer four questions honestly. Skipping this step is how a manageable Category 1 leak turns into a mold remediation bill three weeks later.
How contaminated is the water? Clean supply-line or appliance-overflow water is workable. Anything from a toilet, a sewer line, or floodwater is not; treat that as a job for a professional restoration crew, not fans and a dehumidifier.
How much area is affected? The EPA sets roughly 10 square feet, about a three-by-three-foot patch, as the rough ceiling for what a homeowner should clean and dry without professional mold remediation on standby. Bigger than that, especially if it involves a ceiling or multiple rooms, tips toward calling a pro.
How long has it been wet? Caught within a few hours, you're in good shape. If the leak has been running for more than a day, or you're not sure how long, assume moisture has already reached places you can't see.
Are there already signs of trouble? A musty smell, discoloration, or visible fuzzy growth means mold may already be established, not just a risk, and at that point drying equipment alone won't fix it.
Answer "yes" to any of the risk versions of those questions, contaminated water, more than about 10 square feet, more than 24 to 48 hours wet, or visible mold, and this stops being a DIY job. Answer "no" across the board, and the steps below will get you there.
Step-by-Step: How to Dry Out Water Damage Yourself
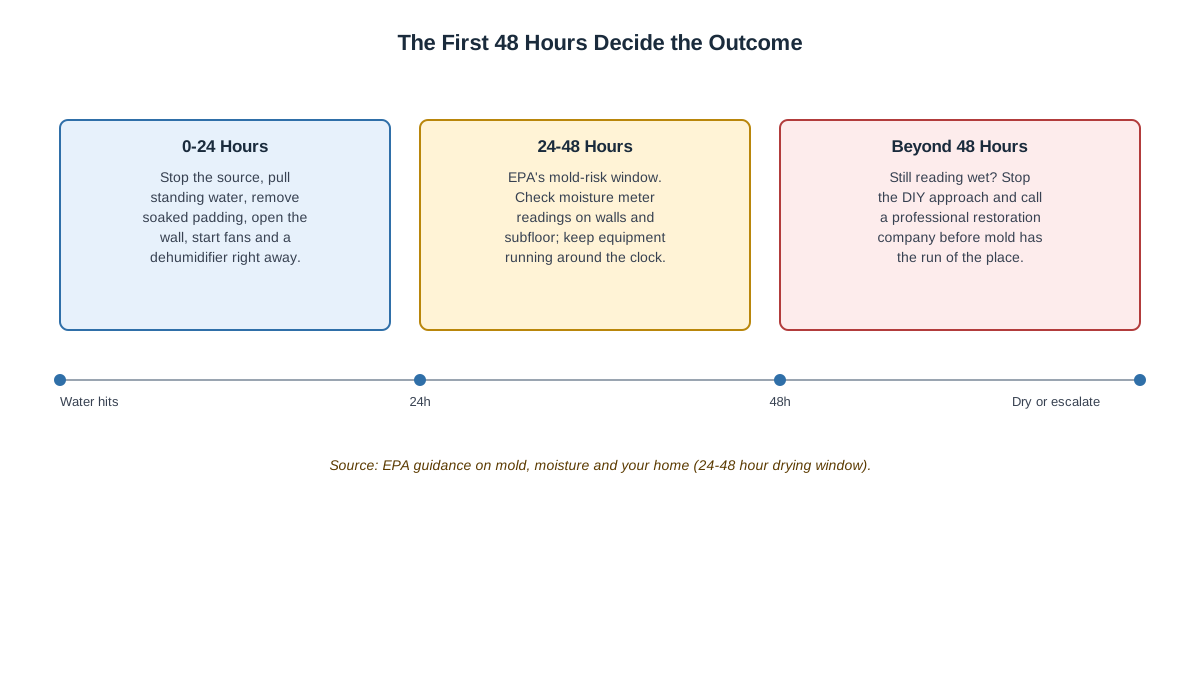
Why the first 48 hours after water intrusion decide whether DIY drying works.
Once you've confirmed this is a Category 1, small-area job, the sequence below is the same one a restoration technician would run, scaled down to homeowner tools.
Stop the source. Shut off the water at the fixture or the main, and unplug anything electrical in or near standing water at the breaker, not by hand.
Remove standing water fast. A wet-vac or a mop and bucket for anything under about half an inch; a submersible pump for more than that. Every extra hour of standing water pushes more moisture into flooring and walls.
Pull out what can't dry in time. Waterlogged carpet padding, cardboard, particleboard furniture, and anything porous soaked for more than a few hours rarely dries clean; bag it and set it outside rather than let it keep feeding moisture back into the room.
Open the space up. Pull baseboards along the wet wall, remove outlet covers with the power off first, and lift furniture on blocks so air can move underneath.
Set up airflow. Point fans across wet surfaces, not just into the middle of the room, so air actually sweeps the material rather than the open floor.
Run a dehumidifier around the clock. Close doors and windows so the unit pulls humidity out of the same air it's already treating, and empty the tank or run a drain line so it never shuts off on its own.
Check with a moisture meter, not your hand. Materials can feel dry on the surface while the framing behind them is still wet; keep equipment running until readings return to normal for that material.
Most Category 1 spots reach that point inside the EPA's 24-to-48-hour window if equipment goes in fast and stays on. If a wall or subfloor is still reading wet after 48 hours of continuous drying, that's a sign the water traveled further than the visible spot, not a sign to run the fans one more day and hope.
How to Dry Wet Walls and a Wet Subfloor
How to Dry Wet Walls
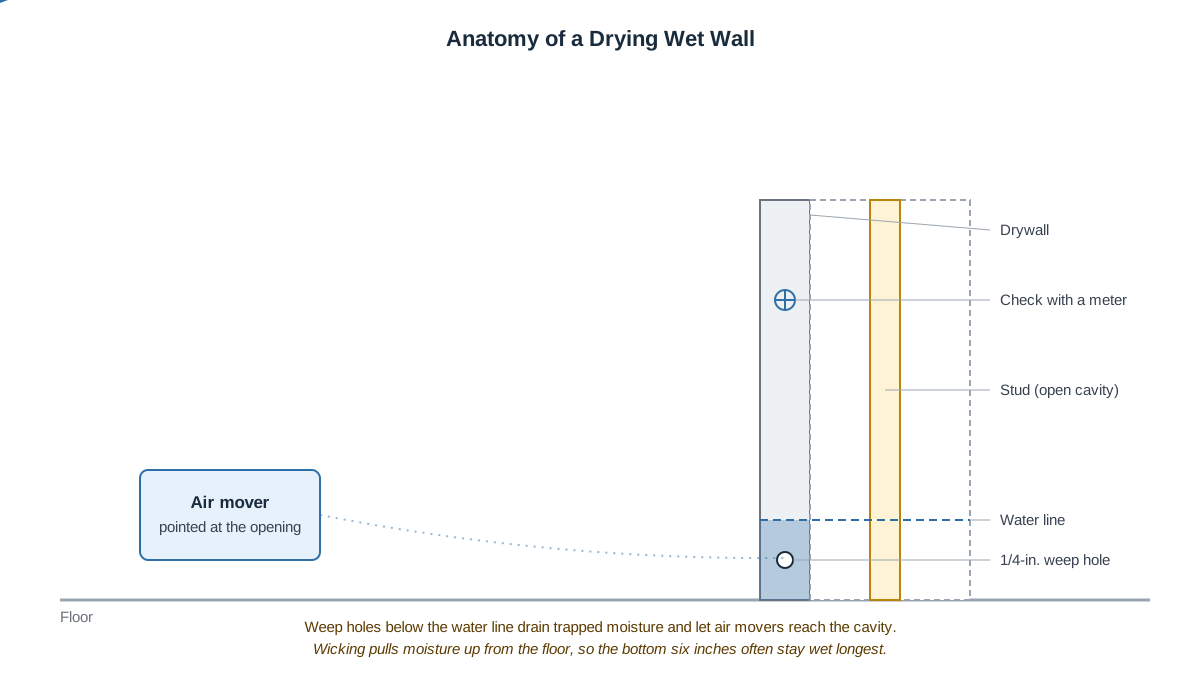
Wet drywall wicks water upward from the bottom, which is why pulling the baseboard and drilling a few quarter-inch weep holes low on the wall, below where the water line was, lets trapped moisture drain and lets air movers actually reach the wall cavity instead of just the painted surface. Point a fan directly at the opening rather than across the room in general, and check both the drywall face and, if you can reach it, the stud behind it with a moisture meter before calling the wall dry. Wicking is the reason a wall can look dry a foot above the baseboard while the bottom six inches are still saturated days later.
If drywall has swelled, crumbled, or separated from the tape at the seams, drying it in place won't undo that; it needs to be cut back to sound material. Our drywall water damage repair guide covers how to tell dry-but-stained drywall from drywall that actually needs replacing.
How to Dry a Wet Subfloor
A wet subfloor is the harder half of this job, because the moisture is trapped between two layers, flooring on top and joists below, with limited airflow either way. For hard flooring, pull a few boards or tiles near the wettest point to let air movers reach the subfloor directly rather than drying through an intact floor. For carpet, pull back the carpet and padding (padding rarely survives a real soaking and is inexpensive enough to just replace) and aim fans at the exposed subfloor. Our wet carpet after water damage guide walks through when carpet itself can be saved versus when it can't.
Professional crews sometimes use specialty floor-drying mats that pull air directly through hardwood or engineered flooring without pulling it up. That's equipment a rental counter is unlikely to carry, and it's one of the clearer lines between a DIY job and one that needs a restoration company, especially over a Class 4 subfloor that's stayed wet more than 48 hours.
Wicking pulls moisture up from the base, so weep holes and airflow have to target the bottom of the wall, not just the visible stain.
Fans, Dehumidifiers and What Actually Dries a Room
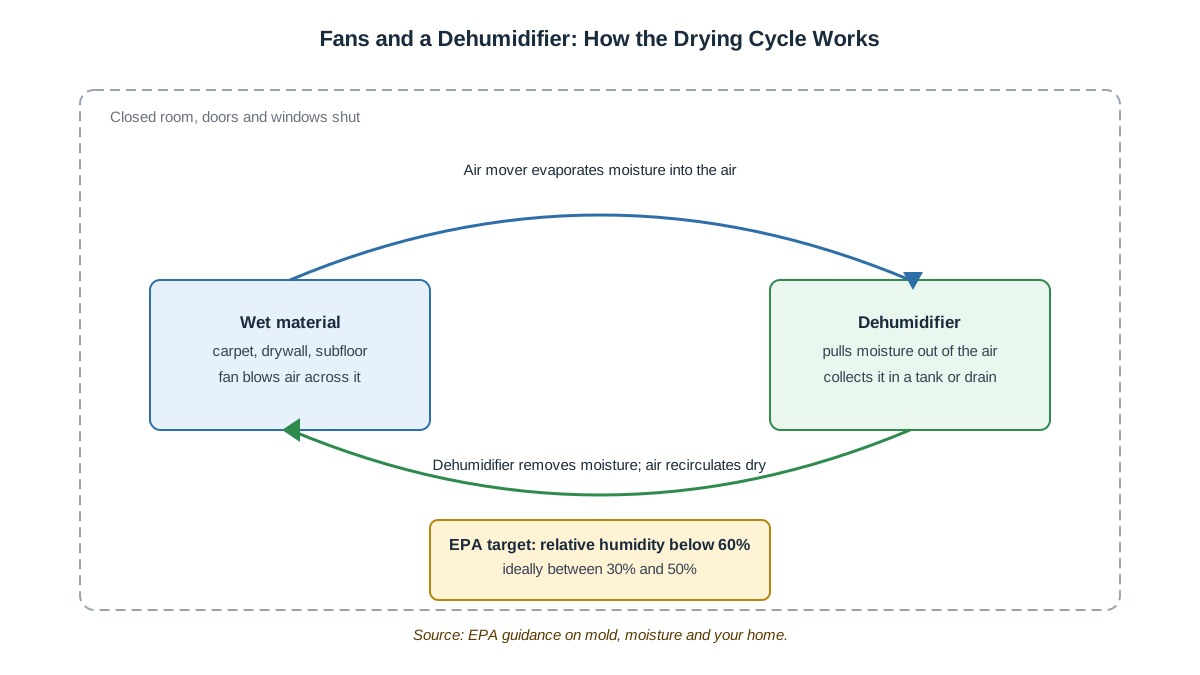
If you searched something like fans and dehumidifiers water damage looking for a straight answer on what to buy or rent, here it is: you need both, running together, not one or the other. Fans, or purpose-built air movers, which push more volume than a box fan, evaporate moisture out of wet materials into the air. A dehumidifier's job is pulling that same moisture back out of the air; run fans alone in a closed room and you're just moving humidity around in circles instead of removing it.
The EPA's target for a drying space is relative humidity below 60%, ideally between 30 and 50%. A basic hygrometer, sold alongside rental dehumidifiers at most tool-rental counters, tells you where the room actually stands rather than leaving it to guesswork. Rental rates and unit sizing, measured in pints of moisture removed per day, vary by market and by how large a space you're drying, so ask the rental counter to size the unit to your room rather than grabbing whatever's on the shelf.
A few things not to do: don't run your central air conditioning or heating system to "help" dry a wet room; it recirculates the same moist air through ductwork that can pick up its own contamination, and it won't out-perform a dedicated dehumidifier. And don't assume a warm day with open windows beats equipment. Outdoor humidity on a muggy day can run higher than what you're trying to remove indoors, which slows drying instead of helping it.
Fans evaporate moisture into the air; only a dehumidifier actually removes it, per the EPA's below-60%-humidity target.
Water Damage DIY vs Professional: How to Decide
What a professional job costs by class, from HomeGuide's 2026 cost data.
Renting equipment for a weekend costs a fraction of a professional restoration call, but only if the job actually stays small. The moment a loss crosses into Category 2 or 3 water, or Class 3 or 4 damage, the math flips, because a missed drying window can turn a few hundred dollars of rental fees into a mold remediation bill on top of the repairs. National cost-survey publishers put real numbers on what a professional job runs, for comparison against what you're weighing against a rental counter and a weekend:
Job or scenario
Typical range
What moves the price
Source
Overall professional restoration job (national average)
$1,383-$6,369 (avg. $3,868)
Category of water, square footage, response time
HomeAdvisor
Class 1 - minimal, small area
$150-$500
Fast response, small footprint
HomeGuide
Class 2 - significant absorption
$1,500-$5,000
Carpet, pad and lower-wall material wicking moisture
HomeGuide
Class 3 or 4 - extensive to specialty drying
$5,000-$100,000
Overhead sources, dense or saturated materials
HomeGuide
Mold remediation, if the drying window is missed
$1,100-$3,400 (avg. $2,225)
Square footage affected, containment needed
HomeAdvisor
There's no published national survey for DIY equipment rental, so the honest advice is qualitative: a couple of air movers and a dehumidifier for three to five days from a local tool-rental counter typically costs far less than any of the professional ranges above, but ask for current local pricing rather than guessing, since rates vary by market and by unit size. The professional ranges in the table above are the same kind of number: each is a researched range pulled from published cost surveys, not a quote for your specific job. The only figure that actually binds is a written estimate from a contractor who's walked the damage in person, and even that can move, since the final price still varies by region, access to the affected area, and how much worse things look once a wall or subfloor actually opens up. For a deeper breakdown by job type, see our water damage restoration cost guide.
Factor
DIY
Professional
Best fit
Category 1, Class 1-2, caught within hours
Category 2-3, Class 3-4, or anything wet past 48 hours
Equipment
Rented fans, dehumidifier, moisture meter
Commercial air movers, desiccant dehumidifiers, thermal imaging
Documentation
Photos and notes you keep yourself
Written scope and moisture logs, often needed for an insurance claim
Mold risk if delayed
Higher, with no professional oversight of the drying window
Lower, with moisture tracked daily against dry-standard readings
When to Stop and Call a Professional
Every step above assumes a best-case scenario: clean water, a small area, caught fast. Real leaks don't always cooperate, and knowing when to stop DIY drying and bring in a licensed crew is the single most important decision in this whole process.
If the water is Category 2 or 3, the affected area is larger than roughly 10 square feet, more than 24 to 48 hours have passed without materials testing dry, or you can already smell or see mold, stop the DIY drying and call a professional restoration company; that's the same threshold the EPA and IICRC use to draw the line between homeowner cleanup and professional remediation.
A few other signs it's time to make the call: sagging ceiling drywall (a real collapse risk, not just a cosmetic one), water that reached above outlet height anywhere in the room, standing water you can't identify the source of, or a subfloor that still feels spongy after several days of equipment running. None of those get better with another day of fans.
If you're at that point, a restoration company that serves your area can pick up from here: 888-407-9931 connects you with one. Before anyone starts work, verify the contractor's state license and confirm they carry current liability insurance; a legitimate crew won't hesitate to show you either one. Describe what you're seeing and how long it's been wet so they can bring the right equipment on the first visit instead of a second trip. Our guide to choosing a water damage company covers what to check before you sign anything, including licensing, insurance, and IICRC certification. If mold is already visible, our mold after water damage guide covers what changes once that line's been crossed.
How to Prevent the Next One
Most of what turns into an emergency drying job started as something preventable. Know where your main water shutoff is, and make sure everyone else in the house does too. The seconds it takes to find a valve during a leak add up to gallons of extra water working into flooring and walls.
Replace rubber supply lines on washing machines, dishwashers, and ice makers with braided stainless versions every five to ten years instead of waiting for one to fail, and check under sinks and behind appliances a few times a year rather than only after you notice a smell. A small water-leak detector near a water heater or under a washing machine costs far less than even a modest DIY drying job, and it can catch a slow leak long before it reaches the 24-to-48-hour mold window.
A sump pump with a battery backup is worth it in any home where grading or a high water table sends water toward the foundation. A pump that fails during the exact storm it was installed for is a common, avoidable version of this whole guide happening again.
Regional Notes: Freeze Belt vs. Hurricane Coast
Where you live changes which kind of water damage you're most likely to be drying out. In states that see hard winter freezes, the Midwest, the Northeast, and the Mountain West among them, a frozen and split pipe in an uninsulated crawl space, attic, or exterior wall is one of the most common causes of a sudden Category 1 loss, and insulating those pipe runs before the first hard freeze prevents more of it than any drying technique after the fact.
Along the Gulf Coast and the Atlantic seaboard, wind-driven rain and storm surge from tropical systems shift the picture toward Category 3 water more often, since floodwater and storm surge carry contamination a clean supply-line break never does. That's a professional job from the start, not a fans-and-a-dehumidifier one. NOAA's climate normals data is a reasonable starting point for understanding which risk profile fits your location before you decide how much to invest in prevention versus keeping a rental counter's number handy. Either way, the drying steps in this guide apply to the clean-water share of any loss; the moment contamination enters the picture, the calculation changes completely.
Frequently asked questions
How long does it take to dry out water damage?+
For a small, clean-water spot caught quickly, expect the room to test dry within the EPA's 24-to-48-hour window once fans and a dehumidifier are running continuously. Larger areas, wet drywall, or a soaked subfloor can take several days longer, and Category 2 or 3 water usually isn't a DIY drying job at all.
Can I dry out water damage myself?+
Yes, for a Category 1 (clean water) loss affecting a small area and caught within a few hours. Once the water is contaminated, covers more than about 10 square feet, or has been sitting more than 24 to 48 hours, professional structural drying and monitoring is the safer, and often cheaper, option in the long run.
What's the fastest way to dry a wet room?+
Remove standing water immediately, pull baseboards and anything porous that can't dry in time, then run air movers pointed at wet surfaces alongside a dehumidifier around the clock rather than opening windows and hoping. Speed in the first few hours matters more than any single piece of equipment.
Do I need a dehumidifier, or are fans enough?+
Fans alone just move humid air around a closed room instead of removing moisture from it. A dehumidifier pulls the water fans evaporate back out of the air, and running both together, with the room closed off, dries materials far faster than either one alone.
How do I know if my walls are actually dry?+
A wall can feel dry to the touch while the drywall or stud behind it still reads wet on a moisture meter, so touch alone isn't reliable. Check with a moisture meter at the baseboard line and a foot or two up the wall, and keep drying equipment running until readings match an unaffected part of the same wall.
How do I dry a wet subfloor?+
Pull back carpet and padding, or a few boards of hard flooring near the wettest spot, so air movers can reach the subfloor directly instead of drying through an intact floor. A subfloor that's still spongy after several days of continuous drying likely needs professional floor-drying equipment or replacement.
Is it safe to use a regular household fan?+
A box fan works for small Category 1 spots, though purpose-built air movers push more volume and dry faster. What matters most is never using any electrical equipment, including a fan, near standing water or a wet outlet; cut power at the breaker first.
When does water damage turn into a mold problem?+
The EPA's guidance points to 24 to 48 hours of continued dampness as the window where mold can start colonizing wet material. Past that point, or once you can see or smell it, drying equipment alone won't solve the problem; it needs mold assessment and remediation on top of drying.
Should I remove wet carpet or drywall myself?+
Carpet padding that's been thoroughly soaked rarely survives and is inexpensive enough to just remove and replace. Drywall that's swollen, crumbling, or separated at the seams needs to be cut back to sound material rather than dried in place; dry-but-stained drywall can often stay.
What's the difference between DIY water damage cleanup and calling a professional?+
DIY water damage cleanup covers extraction and drying with rented fans and a dehumidifier for small, clean-water losses. A professional restoration company adds moisture monitoring against industry dry-standard readings, specialty equipment for dense materials, contamination handling for Category 2 or 3 water, and documentation an insurance claim often requires.