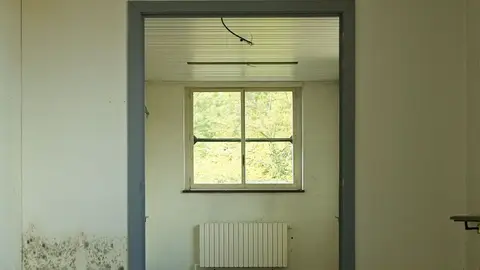
Most water damaged drywall can be repaired rather than replaced if the affected area is under about 10 square feet, the water was clean (a supply line, not sewage), and the wall dried within 24 to 48 hours. Drywall water damage repair for a small patch runs $300 to $850; sagging, moldy, or contaminated sections need full replacement instead.
Water finds drywall fast. A slow leak behind a sink, a roof that let rain in during a storm, or a washing machine hose that let go overnight all end up in the same place: the paper facing and gypsum core of a wall or ceiling. Water damaged drywall doesn't fail all at once. The paper darkens and bubbles first, the surface goes soft under a thumb press, and if the water sat long enough the panel sags under its own weight. Water damage and freezing account for more than a quarter of all homeowners insurance claims nationally, so if you're staring at a stain right now, you're dealing with something common, not rare.
The question that actually matters is whether that section of wall can be dried and patched, or whether it has to come out. The answer depends on three things: how much water got in, how contaminated it was, and how fast you caught it. This guide walks through drywall water damage repair step by step, what it costs, when the job is too big or too risky to do yourself, and how to keep it from happening again.
What Causes Drywall Water Damage, Ranked by How Common It Is
Plumbing leaks cause more water damaged drywall than anything else: a slow drip from a supply line under a sink, a failed washing machine hose, or a pipe that lets go inside a wall. Because this water usually starts out clean, what the IICRC calls Category 1 water, drywall that dries fast often survives with nothing worse than a stain.
Appliance leaks come next, especially water heaters, dishwashers, and washing machines that fail while nobody's home. These leaks often run for hours before anyone notices, which pushes water higher up the wall and deeper into the gypsum core than a quick spill ever would.
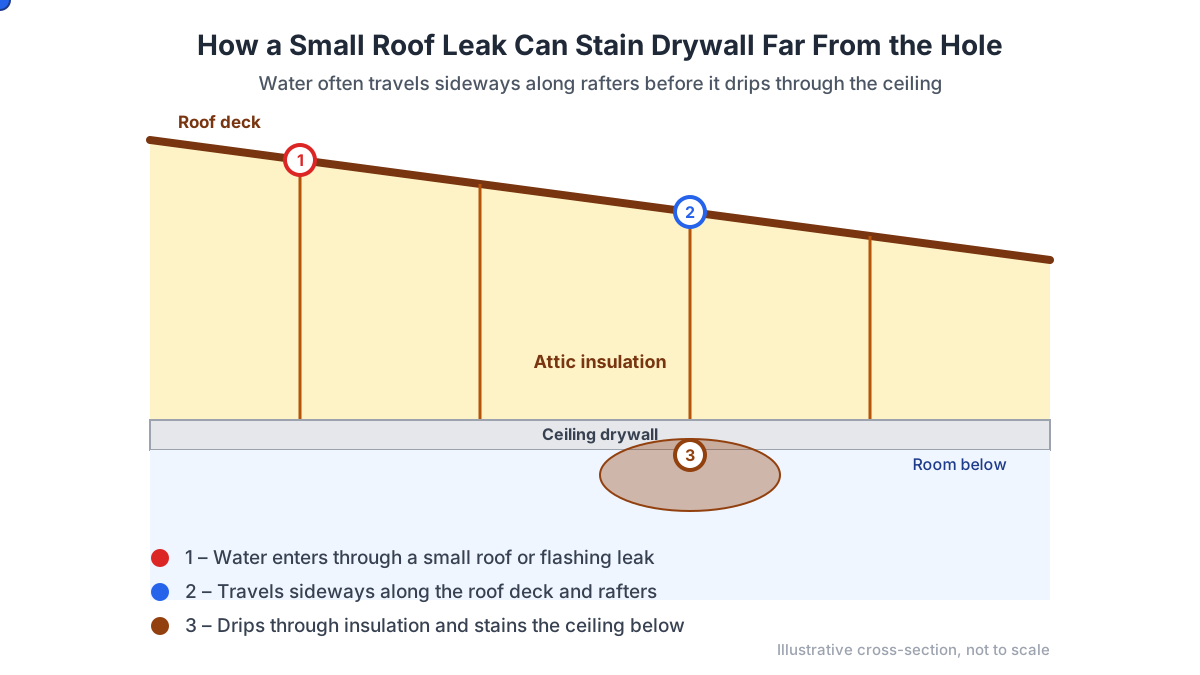
Roof and attic leaks show up as a water stain on a ceiling long before anyone finds the actual hole, because rain travels sideways along rafters and drips somewhere else entirely. A clogged or disconnected HVAC condensate line does the same thing from inside a closet or an attic platform, quietly, for weeks.
Basement seepage, sump pump failures, and storm or flood water round out the list, and they matter more than their frequency suggests. These sources tend to bring in Category 2 or 3 water, gray water from an appliance overflow or grossly contaminated water from a sewer backup or floodwater, and that single fact changes almost everything about how the repair should go.
If you want the full walk-through of what a professional crew does once a diagnosis is made, our water damage restoration process guide covers extraction through final drying, step by step.
Roof leaks often travel sideways along rafters, so a ceiling stain rarely sits right below the actual hole.
How to Tell If Water-Damaged Drywall Can Be Saved
Before you decide anything, confirm the water is stopped. Shut the supply valve, unplug the appliance, or confirm a roof leak is at least temporarily covered, so you're not diagnosing a wall that's still getting wetter while you work.
Press a thumb into the stain. Firm and dry to the touch usually means the surface can be cleaned, primed, and repainted. Soft, spongy, or crumbling means the gypsum core absorbed water and that section has to come out.
Look for sagging, especially overhead. A ceiling panel that bows or drips under its own weight has already failed structurally and needs full replacement, not a patch.
Measure the affected area. EPA guidance treats about 10 square feet, roughly a 3-by-3-foot patch, as the practical ceiling for a homeowner to handle without bringing in professional mold remediation.
Note what the water actually was. Category 1 water from a clean supply line behaves very differently than Category 2 or 3 water from a dishwasher, a sump pump, or a sewer backup under the IICRC's water damage categories and classes. Contaminated water usually means replacement regardless of how the surface looks.
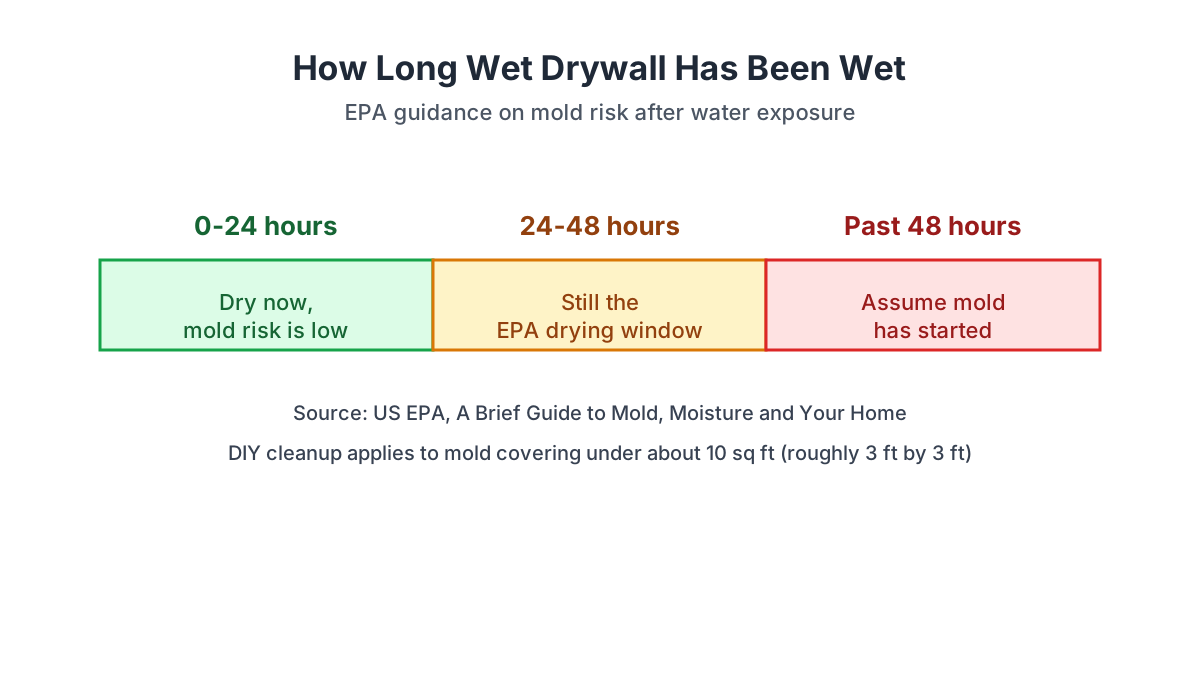
Time the drying. If the section was fully dry within 24 to 48 hours of the leak starting, per EPA guidance, mold risk stays low. Past that window, assume mold has started even without visible signs, and plan to remove more material than the stain alone suggests.
How long drywall has been wet changes the mold risk, per EPA guidance.
Class 1 Through Class 4, in Plain Terms
Restoration companies also grade jobs by class, a separate scale under the IICRC S500 standard that describes how much of the structure absorbed water, not how contaminated it was. It's worth knowing where your situation lands, because class drives both the repair scope and, loosely, the cost.
Class (IICRC S500)
What it typically means
Typical repair cost range
Source
Class 1
Smallest area, limited to part of one room
$150 – $500
HomeGuide, 2026
Class 2
Whole room affected, water wicked into walls and flooring
$500 – $1,000
HomeAdvisor, 2026
Class 3
Water came from overhead; ceiling, walls, and insulation are all wet
$1,000 – $3,000
HomeAdvisor, 2026
Class 4
Deep moisture in low-permeance materials like plaster or concrete; needs specialty drying
$20,000 – $100,000
HomeAdvisor, 2026
Most single-room drywall water damage repair jobs land in Class 1 or Class 2. Class 3 and 4 are where a homeowner's decision to DIY should end, even if the drywall itself still looks patchable.
Dry It, Cut It, or Replace It: How to Decide
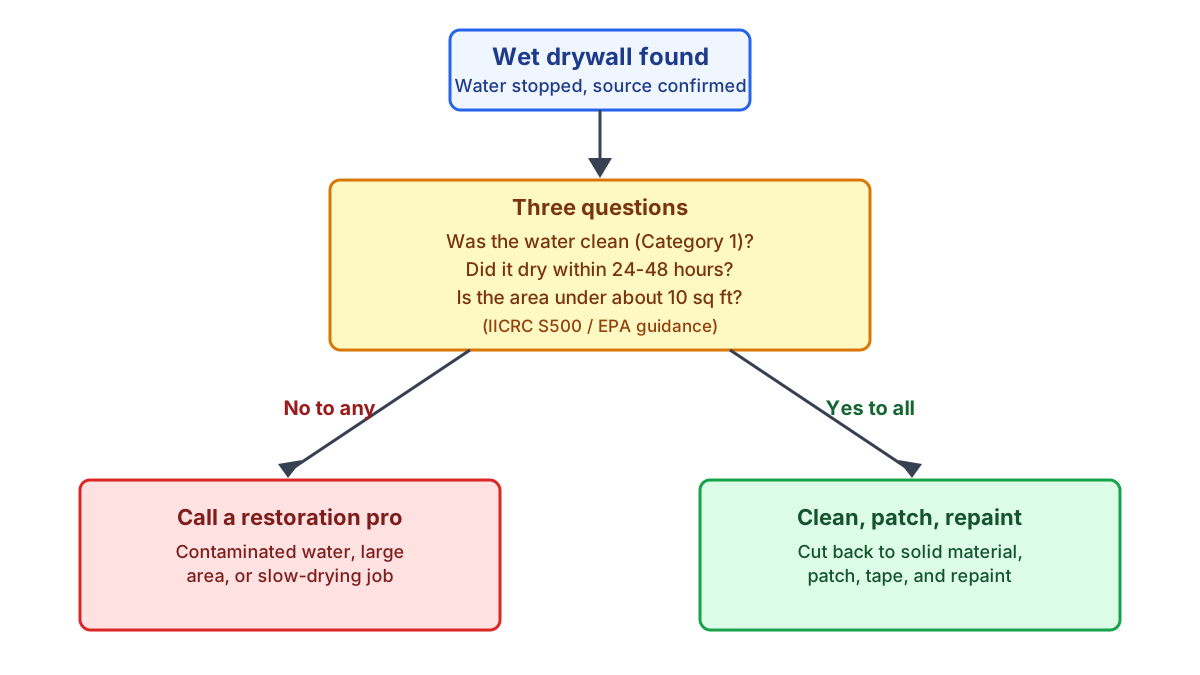
Once you know how big the affected area is, whether the water was clean, and how fast it dried, the decision mostly makes itself. The table below covers the four situations that come up most often.
Three questions decide whether to patch water-damaged drywall yourself or call a pro.
Situation
What to do
Why
Small stain, drywall still firm, dried within 24-48 hrs, clean water
Soft or damp spot under about 10 sq ft, clean water
Cut out the section and patch it
Matches the EPA's rough DIY threshold for mold-safe repairs
Area over 10 sq ft, or any gray or black water
Full section or whole-wall replacement, ideally by a pro
Larger and contaminated jobs sit outside safe DIY scope
Ceiling panel bowing, sagging, or actively dripping
Do not patch; replace the whole section
A saturated ceiling panel can fail without warning
The exceptions are worth flagging early: drywall replacement cost runs meaningfully higher than a patch, so it's tempting to stretch the "just patch it" option past where it belongs. A soft spot that keeps growing after you thought you'd dried it out means the water is still moving inside the wall, not evidence that you didn't dry it well enough.
How to Repair Water-Damaged Drywall Yourself
This is realistic for a homeowner comfortable with basic tools when the damaged area is small, the water was clean, and there's no sign of mold. If any of that isn't true, skip ahead to when a professional should take over.
Ventilate the room. Open windows, run a fan, and if you have one, point a dehumidifier at getting relative humidity below 60 percent, the EPA's ceiling for controlling indoor mold growth.
Cut back to solid, dry material. Score a rectangle a few inches past the visibly damaged area on every side, centered over wall studs or ceiling joists so the patch has something to screw into.
Check what's behind the drywall. Wet insulation almost never dries out on its own and should come out; damp but sound framing usually air-dries in place once the drywall is open.
Let the cavity dry fully before closing it back up. A moisture meter takes the guesswork out of this step; without one, wait several days with fans running and re-check by feel.
Cut a new drywall patch to fit the opening, screw it to the studs or joists, and tape the seams with joint compound in two or three thin coats, sanding lightly between each one.
Match the texture, prime the patch, and repaint the full wall or ceiling rather than just the patch, since a spot-painted section almost always shows as a slightly different sheen once it's dry.
For more on the drying step itself, including how professionals speed it up with air movers and dehumidifiers, see our how to dry out water damage guide.
The six-step sequence for patching a small, clean-water drywall section yourself.
What Drywall Water Damage Repair Costs
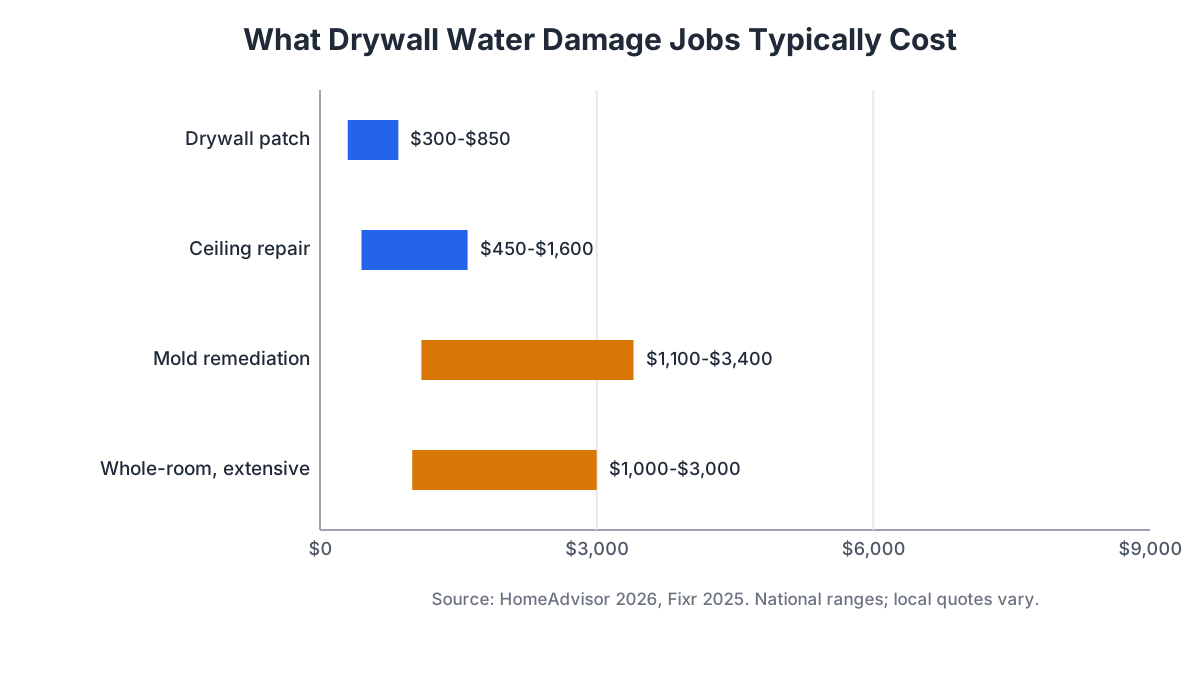
National cost-estimating publishers put a small drywall water damage repair patch at $300 to $850, while a full drywall replacement cost for a wall or ceiling section runs higher once framing, insulation, and larger patches are involved. A water damage drywall ceiling repair in particular tends to land above a comparable wall job, both because of overhead labor and because ceiling texture is harder to match invisibly.
Job
Typical range
What moves the price
Source
Drywall patch repair (small wall section)
$300 – $850
Size of the patch, texture matching, paint
HomeAdvisor, 2026
Ceiling drywall repair
$450 – $1,600
Overhead labor, access, harder texture match
HomeAdvisor, 2026
Water extraction before drywall work
$3.75 – $7.50 per sq ft
Water category: clean water costs far less to extract than contaminated water
Fixr, 2025
Mold remediation add-on, if present
$10 – $30 per sq ft ($1,100 – $3,400 typical)
Extent of growth, containment, air scrubbing
HomeAdvisor / Fixr
Whole-room restoration, extensive damage
$1,000 – $3,000
Saturated insulation, multiple wet materials, more demolition
HomeAdvisor, 2026
Typical national cost ranges for drywall water damage jobs, smallest patch to whole-room restoration.
How We Got These Numbers
These ranges come from national cost-estimating publishers surveyed in 2025 and 2026, not from any single contractor's price list. Labor alone runs $70 to $200 an hour depending on region, and emergency or after-hours service can add $50 to $200 more, so two homes with an identical hole in the drywall can land on different bills for reasons that have nothing to do with the repair itself. A written, itemized estimate from a contractor who has actually looked at your wall is the only way to get a number you can rely on. Treat every figure on this page as a researched range pulled from those surveys, not a quote for your repair — what you actually pay varies by region, how hard the area is to access, and how much rot or mold the crew finds once the wall is open, and only a written estimate from a contractor who has walked your job is binding.
Mold Risk Behind Wet Drywall
Mold doesn't wait for you to finish diagnosing the problem. EPA guidance is blunt about it: dry water-damaged materials within 24 to 48 hours or assume mold growth has already started. Paint and drywall paper can look completely normal from the room side while the back of the panel, against the stud or inside a seam, is growing something you can't see yet.
The EPA also draws a practical line for homeowners: mold covering less than about 10 square feet, roughly a 3-by-3-foot patch, generally falls within DIY cleanup's scope. Anything larger, or wet drywall that's been sitting for more than two days, points toward a professional following the IICRC S520 mold remediation standard rather than a homeowner with a spray bottle and gloves.
A musty smell without a visible stain is often the first sign of hidden mold behind an otherwise intact wall. If that's what you're noticing, our mold after water damage guide covers how fast it spreads and what remediation actually involves once it's confirmed.
When the Job Needs a Professional
Some calls here are about safety, not just cost. If the water that reached your drywall came from a toilet, a sewer backup, floodwater, or a failed sump pump, treat it as contaminated water and call a licensed restoration company instead of cutting into it yourself.Category 2 and 3 water can carry bacteria that a dust mask and gloves don't fully protect against, and drywall that absorbed it needs to be bagged and hauled out, not sanded.
A few other situations belong to a professional even when the water started clean: a ceiling panel that's sagging or actively dripping, any area larger than roughly 10 square feet, water that soaked walls near an outlet or switch, and any leak that ran unnoticed for more than a couple of days before you found it. Electrical hazards in particular are not worth guessing about; if there's standing water anywhere near wiring, shut off power to that area at the breaker before you do anything else.
If you're not sure whether what you're looking at is Category 1 or something worse, call 888-407-9931 and describe what happened and what the drywall looks like; a restoration company that serves your area can talk you through it or send someone out to test the wall directly.
How to Choose a Restoration Company If You Need One
If the damage is bigger than a DIY patch, or the water was contaminated, the company you hire matters as much as the repair itself. Look for technicians who carry an active IICRC certification under the S500 water damage standard, and S520 as well if mold remediation is part of the job. That certification means they've been tested on the same category-and-class system this guide walks through, not just handed a shop-vac and a truck.
What a Written Estimate Should Include
Ask for a written estimate before work starts, and expect it to list square footage affected, whether mold remediation is a separate line item, what gets dried in place versus removed, and proof of general liability insurance. A company that skips straight to a lump-sum number without looking at the wall is worth a second opinion. Before you sign anything, verify the license is current and confirm that liability insurance policy is still active — most state contractor licensing boards run a free public lookup that answers both in a couple of minutes, and a company that hesitates when you ask is telling you something.
Red Flags
Be wary of anyone who shows up uninvited after a storm, demands full payment in cash before starting, or pressures you to sign an insurance assignment on the spot without reading it. Our full guide on how to choose a water damage company covers licensing checks and more red flags in depth.
If you'd rather talk it through than read another list, a restoration company that serves your area is reachable at 888-407-9931 for a second opinion on the diagnosis above.
Do it yourself when...
Call a pro when...
Water was clean and stopped within minutes
Water sat more than two days, or the source is unknown
Affected area is under about 10 sq ft
Area is larger, or mold is visible or smelled
You're comfortable cutting, taping, and mudding drywall
Ceiling is sagging or feels structurally unsound
No insurance claim is being filed
You're filing a claim and need documentation done right
How to Prevent Drywall Water Damage
Most of the drywall repairs in this guide trace back to a handful of preventable failures, which is good news: a little maintenance heads off a lot of cutting and patching.
Check supply lines and hoses on washing machines, dishwashers, and toilets every year, and replace rubber ones with braided stainless steel before they're a decade old.
Know where your main water shutoff valve is, and make sure everyone in the house does too, since the first minute of a leak decides how much drywall ends up wet.
Keep gutters clear and downspouts directed away from the foundation so roof water has somewhere to go besides your attic and exterior walls.
Have your HVAC condensate line checked during routine service; a clogged line is a slow, quiet way to soak a closet ceiling for weeks before anyone notices.
Consider a water sensor near appliances and under sinks. They're inexpensive, and an alert at hour one beats finding water damaged drywall at hour forty.
None of this eliminates risk entirely, but it shifts most leaks back toward the small, clean-water, quick-to-dry category that a homeowner can actually handle.
Regional Notes: Freeze Belt, Hurricane Coast, and Humid Climates
Where you live changes which kind of drywall water damage repair you're most likely to face, even though the repair techniques themselves don't change.
In freeze belt states, the most common cause is a supply line that froze and split inside an exterior wall during a cold snap, then thawed and sprayed water into the wall cavity for hours before anyone was home to notice. That water usually starts clean, but the volume and the hours it runs unattended before discovery often push the job into a larger class than a typical indoor leak.
Along the hurricane coast, the bigger risk is contaminated water from the outset. Storm surge and river flooding are treated as grossly contaminated water regardless of how clean the source looked before the storm, and FEMA notes that just one inch of floodwater in a home can cause roughly $25,000 in damage, which usually means far more than a drywall patch is involved. If flooding is a realistic risk where you live, our flood damage restoration guide covers the NFIP claim process separately from a standard homeowners claim.
In humid Gulf and Southeast climates, ambient humidity that's already close to the EPA's 60 percent threshold makes the drying window shorter in practice, even when the leak itself is small and clean. A dehumidifier isn't optional gear in these regions; it's often the difference between a same-week patch and a section that has to come out because the air around it never let the wall finish drying.
Frequently asked questions
Can water-damaged drywall be repaired, or does it always need to be replaced?+
It can often be repaired rather than replaced. If the affected area is under about 10 square feet, the water was clean, and the panel dried within 24 to 48 hours, cutting out and patching that section, then priming and repainting, is usually enough. Larger areas, sagging panels, mold, or contaminated water push the job toward full replacement instead.
Do I need to replace drywall that got wet just once?+
Not necessarily. A single, brief wetting from clean water, like a quick overflow you mopped up right away, often dries out fine if you catch it before 24 to 48 hours pass. Press-test the spot once it looks dry; firm and solid means it survived, soft or crumbly means that section needs to come out.
When should I replace drywall instead of patching it after water damage?+
Replace it once the damage covers more than about 10 square feet, the panel sags or feels spongy, you can smell mold, or the water that caused it was gray or black water rather than a clean supply-line leak. Those situations sit outside what the EPA and IICRC consider a straightforward DIY patch job.
How do I repair water-damaged drywall on a ceiling?+
Ceiling repairs follow the same cut-back-to-solid-material and patch process as a wall, but check for sagging first, since a bowed or dripping ceiling panel can fail without warning and should be fully replaced, not patched. Because ceilings involve overhead work and tougher texture matching, expect the repair to run higher than a comparable wall patch, roughly $450 to $1,600.
How much does it cost to repair drywall water damage?+
A typical small patch runs $300 to $850, while a ceiling section runs $450 to $1,600, based on national cost-estimating data. Add mold remediation, at $10 to $30 per square foot, if growth is present, or whole-room restoration costs of $1,000 to $3,000 or more if the water was contaminated or the damage is extensive. A written local estimate is the only way to get an exact number.
How do I repair a small area of water-damaged drywall myself?+
Dry the area first, then cut a rectangle a few inches past the damage on all sides, centered over a stud or joist. Remove any wet insulation, let the cavity dry, screw in a matching drywall patch, tape the seams with joint compound in thin coats, sand, prime, and repaint the full wall so the patch doesn't show as a different sheen.
How do I fix a bad drywall repair that someone else left behind?+
Sand down any visible ridges or bubbling tape first, then check with a straightedge whether the patch sits flush with the surrounding wall. If the old patch is cracking or the tape is lifting, cut it back to solid material and re-tape it properly rather than layering more compound over a failing repair, which usually just delays the same crack coming back.
How long does wet drywall take to dry before I can decide whether to patch it?+
Under EPA guidance, materials that dry within 24 to 48 hours of getting wet carry a low mold risk, so that window is a reasonable point to check firmness and make the patch-or-replace call. Past 48 hours, assume mold growth has started even without visible signs, and plan to remove more material than the stain alone suggests.
Is patching water-damaged drywall cheaper than full replacement?+
Yes, usually. A patch on a small, clean-water section typically costs $300 to $850, while replacing a full wall or ceiling section, especially with mold remediation added at $10 to $30 per square foot, easily reaches into the thousands. The gap is exactly why an accurate diagnosis in the first 48 hours matters as much as the repair itself.
Can I paint over water-damaged drywall without repairing it first?+
No. Paint won't stop moisture still in the gypsum core or behind the panel, and sealing it in traps humidity that feeds mold growth instead of solving anything. Dry and, if needed, cut out the damaged section before repainting; painting over an unrepaired water stain is one of the more common ways a small problem turns into a bigger one.