A thermostat not working is usually simple: dead batteries, a tripped breaker, a blown low-voltage fuse, or a loose wire behind the faceplate. Start with power and wiring before assuming the unit itself failed. Genuine thermostat replacement runs $150 to $500 installed. Smart thermostats add a wrinkle: many older systems lack the C-wire they need to run reliably.
The screen goes dark, or the house sits at sixty-eight degrees no matter what the dial says, and the temptation is to assume the whole system just quit. Most of the time it hasn't. A thermostat not working is one of the cheapest, fastest problems in a home to fix correctly, and one of the easiest to fix wrong by throwing an expensive part at a two-dollar issue. A dead AA battery looks identical to a failed circuit board from across the kitchen. A tripped breaker looks identical to a burned-out transformer. The difference matters, because one costs nothing and the other can run into the hundreds.
This guide walks through the causes ranked by how often they actually happen, a step-by-step way to tell them apart in the next fifteen minutes, what a fair repair or thermostat replacement costs nationally, and where the line sits between a Saturday-afternoon fix and a job that belongs to a licensed HVAC contractor. Every dollar figure below is a researched range pulled from published national contractor cost surveys, cited at the bottom of the page, not a quote for any specific job — a guess dressed up as a number is worse than no number at all.
What It Actually Means When a Thermostat Stops Responding
A thermostat is a small, low-voltage switch. In most homes it runs on 24 volts pulled from a transformer inside the furnace or air handler, not household current, which is one reason a battery or a loose wire can take the whole system down even though nothing about the furnace or air conditioner itself has failed. When the screen goes blank, the schedule resets itself, or the house stops responding to the dial, the fault sits in one of three places: the thermostat's own power supply, the low-voltage wiring connecting it to the equipment, or the equipment's control board on the other end of that wire.
That distinction is worth sitting with for a second, because it changes what "not working" should cost to fix. A dead battery or a tripped low-voltage fuse is a five-minute, no-cost fix. A loose or corroded wire behind the faceplate is a fifteen-minute fix most homeowners can do themselves. A truly failed thermostat, or a control board on the furnace side that the thermostat was only reporting, is where real money enters the picture, and where thermostat replacement becomes the honest answer.
Why Thermostats Fail: Causes Ranked by How Likely They Are
Contractors see the same handful of causes over and over, and they cluster heavily toward the cheap end of the list. Dead or corroded batteries account for more blank-screen calls than every other cause combined, especially in thermostats that use batteries only as backup power and fail quietly once that backup runs out between visits. A close second is a tripped breaker or a blown low-voltage fuse on the furnace or air handler's control board, often triggered by a short somewhere else in the low-voltage wiring rather than by the thermostat itself.
After power issues, the next tier is wiring: a wire that worked loose during a battery change, a connection that corroded inside a wall over years, or a miswired terminal after a do-it-yourself thermostat swap. Thermostat wiring uses color-coded, lettered terminals, and a wire on the wrong terminal can cause anything from no response at all to a system that runs constantly. Further down the list sits a truly failed thermostat, worn contacts or a dead internal sensor on an older mechanical or basic digital model, then a failed transformer or control board on the equipment side, which is the rarer, more expensive cause that a thermostat problem sometimes only masks.
Smart thermostats add one cause unique to them: smart thermostat compatibility. A system built for a simple two-wire setup, or missing a dedicated common wire, can leave a smart thermostat cycling on battery power that drains fast, rebooting, or losing its Wi-Fi connection, symptoms that look like a defective unit but are really a wiring mismatch the installer should have caught.
How to Diagnose It in the Next Fifteen Minutes
Matching the symptom to the likely cause narrows the job before any tools come out.
Symptom
Most likely cause
Check first
DIY or call a pro
Screen is completely blank
Dead batteries or a tripped breaker
Batteries, then the breaker panel
DIY
Screen lit, system will not respond
Loose or miswired low-voltage wire
Wire terminals behind the faceplate
DIY, with power off first
Smart thermostat reboots or loses Wi-Fi
Missing or borrowed common wire
C-wire terminal, maker's compatibility tool
DIY check, pro for a C-wire run
Furnace short-cycles, thermostat looks "stuck"
Equipment-side safety lockout, not the thermostat
Filter, then flame sensor and limit switch
Pro
Breaker will not stay reset
Active electrical short
Stop resetting it
Pro, same day
Work through these checks in order. Most thermostat problems resolve before step five.
Check the display. A thermostat blank screen almost always means a power problem, not a broken circuit board: dead batteries, a tripped breaker, or a blown fuse on the equipment's control board.
Replace the batteries even if the old ones test fine on a multimeter; a fresh AA cell reads close to 1.5 volts whether or not it can deliver current under load, so a battery can test as good on a no-load check while still lacking the current a thermostat needs once it actually switches something on.
Check the breaker panel and any furnace-mounted service switch. A single reset is reasonable. A breaker that trips again right away means stop and call a technician, since that points to an active short.
Open the equipment's circuit board and look for a small automotive-style fuse near the transformer; a blown one is a cheap, five-minute swap once the short that caused it has been found and fixed.
With power confirmed, pull the thermostat faceplate and check that each wire is seated firmly on its labeled terminal, matching the letter on the wire to the letter on the base. A wire that slipped loose during cleaning or a battery change is a common, easy fix.
Note whether the fan runs, whether the outdoor unit or furnace makes any sound, and whether the problem is constant or comes and goes with temperature or humidity. Writing it down before calling anyone cuts diagnostic time noticeably.
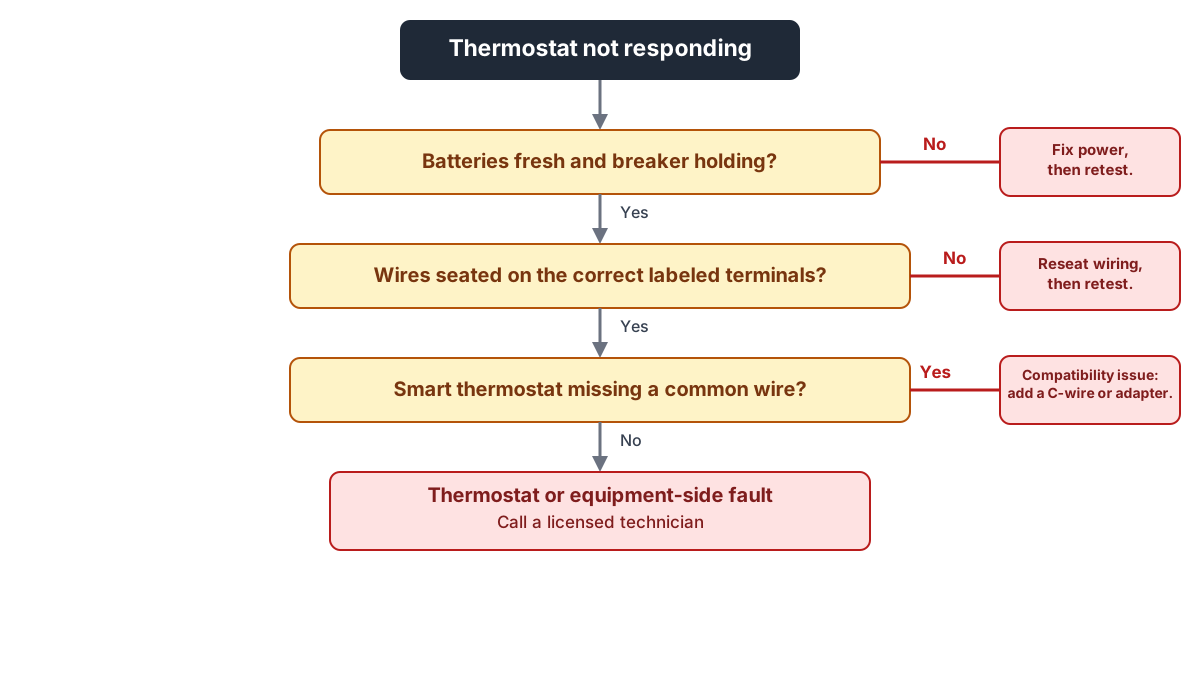
If the screen is lit, the wiring looks solid, and the system still will not respond, that combination usually means the thermostat itself has failed or the problem sits on the equipment side. The flowchart below walks through the same order of checks visually.Work top to bottom: batteries and breaker first, then wiring, then a missing common wire on smart models. What is left over belongs to a technician.
What You Can Safely Fix Yourself
A short list of thermostat fixes is genuinely within reach for most homeowners, and trying them first turns a service call into a non-event.
Replacing batteries with a fresh, matched set, and confirming the battery compartment contacts are not corroded.
Resetting a tripped breaker once, then watching whether it holds.
Re-seating a loose wire on its correct, labeled terminal after confirming the power is off at the breaker or service switch.
Cleaning dust from the terminals and the inside of the wall plate with a dry brush, since dust buildup can cause an intermittent connection that looks like a dead unit.
Re-mounting a thermostat that reads the wrong temperature because it sits in direct sun, near a heat register, or on an exterior wall.
Confirming the mode and schedule settings are correct, especially after a power outage resets a basic model to a default program.
What does not belong on this list: opening the furnace or air handler's control board, working inside the electrical panel beyond a single breaker reset, or wiring a smart thermostat into a system whose compatibility has not been confirmed first. If the checks above do not resolve it, the step-by-step guide for an AC that will not turn on or the furnace no-heat diagnosis covers what to check next on the equipment side itself.
Thermostat Wiring and Smart Thermostat Compatibility
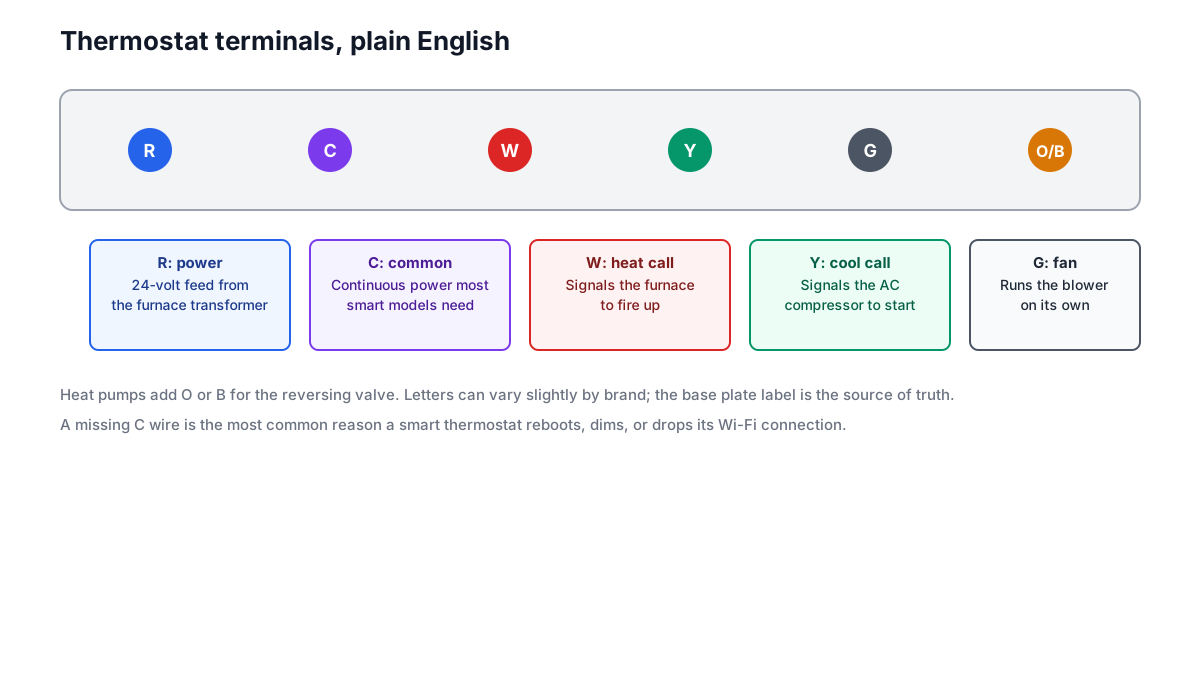
Thermostat wiring — typically 18-gauge to 22-gauge multiconductor cable — follows a standard, if not universal, letter code: R carries 24-volt power from the transformer, C is the common wire that completes the circuit for continuous power, W calls for heat, Y calls for cooling, and G runs the fan. Heat pumps add O or B for the reversing valve. A basic mechanical or digital thermostat can often run without a C-wire, drawing tiny amounts of power only when it switches something on. A smart thermostat, with its screen, Wi-Fi radio, and always-on processor, usually cannot.
That one wire is the single biggest source of smart thermostat compatibility trouble. Homes built before smart thermostats existed frequently ran only four wires, skipping the common. Some smart thermostats work around a missing C-wire by borrowing tiny amounts of current from another wire, a workaround that can cause exactly the symptoms that bring people to this page: a screen that dims or reboots, a Wi-Fi connection that drops, or a fan that runs when it should not. The manufacturer's own compatibility checker, run against the wire labels visible on the old thermostat's base before removing it, catches most of these mismatches before installation rather than after.
A wire that will not seat, insulation that has cracked with age, or a wire nutted together loosely inside the wall is a separate, purely mechanical problem, one a homeowner comfortable working with 24-volt wiring can usually fix directly.The standard letter code behind most thermostat wiring, and why the C terminal matters most for smart models.
When the Problem Needs a Licensed Technician
A handful of situations move a thermostat problem out of do-it-yourself territory. Line-voltage thermostats, the kind wired directly to a baseboard heater or an older wall furnace at full household voltage rather than 24 volts, are not a safe learning project; a mistake there is a shock or fire risk, not an inconvenience. Any work inside the furnace or air handler's control board, any repair to the transformer itself, and any diagnosis that requires opening the electrical panel beyond a single breaker reset belongs to a licensed HVAC contractor.
There is also a safety signal that has nothing to do with wiring skill. If you smell gas anywhere near the furnace while troubleshooting a "dead" thermostat, stop what you are doing, leave the house, do not flip any switches or breakers on your way out, and call your gas utility's emergency line or 911 from a safe distance; a thermostat is never the cause of a gas odor, and it is not yours to diagnose. If the furnace short-cycles repeatedly or locks out while you are testing a thermostat, stop resetting it and call a licensed technician instead of forcing another restart. A thermostat that seems to be causing a furnace to shut off after a few minutes can be masking a flame-sensor or heat-exchanger problem that has nothing to do with the thermostat at all. Heating equipment failures are common enough that NFPA counts an average of 44,210 home fires caused by heating equipment each year nationally, and forcing a restart on a system that is protecting itself from a real fault is how a cheap problem turns into an expensive, or dangerous, one.
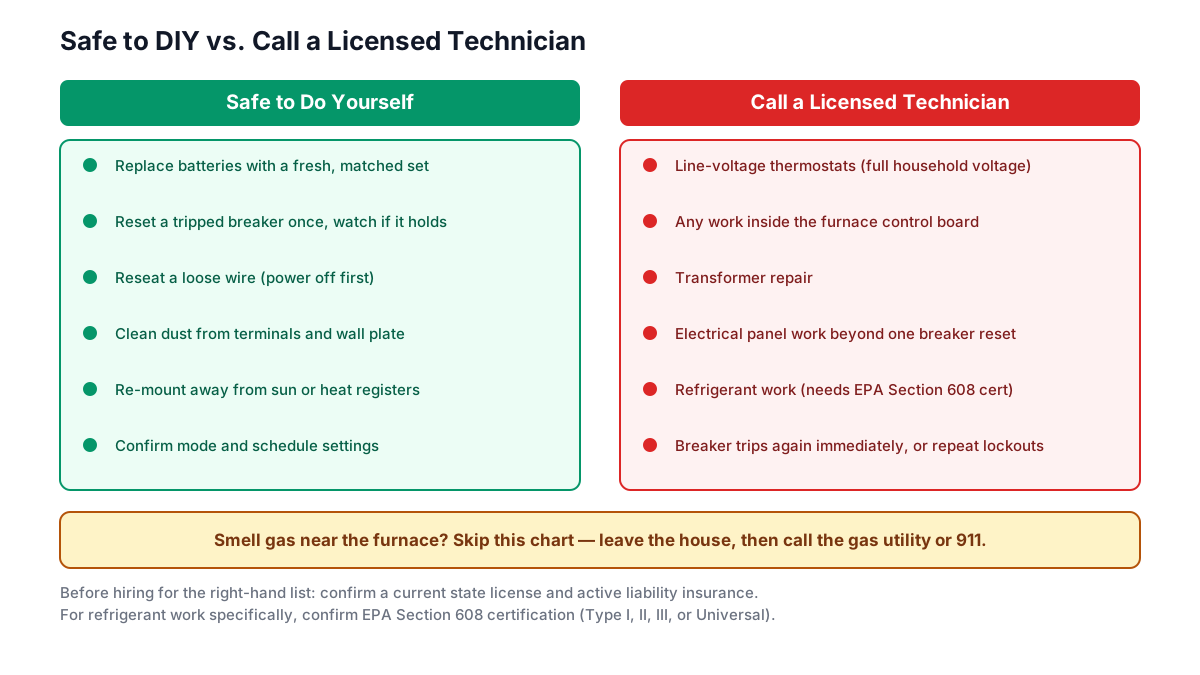
Under federal law, anyone servicing equipment that could release refrigerant is required to hold one of the four EPA Section 608 certification types — Type I, Type II, Type III, or Universal — which rules out do-it-yourself work on the cooling side beyond the thermostat itself. Ask whether a technician holds NATE certification, the North American Technician Excellence credential covering electrical and controls competency that requires recertifying every 2 years, before letting anyone open equipment beyond the thermostat. Before that work starts, verify the contractor's state HVAC or mechanical contractor license is current and confirm active liability insurance; both are standard, reasonable requests a legitimate company answers without hesitation. The full guide to vetting an HVAC contractor covers licensing, insurance, and red flags in more depth. The chart below lines up what is safe to handle yourself against what belongs to a licensed technician.A quick gut-check for which thermostat fixes are safe to try yourself and which cross into licensed-technician territory, plus the one sign (a gas smell) that overrides both columns.
What Thermostat Repair and Replacement Cost
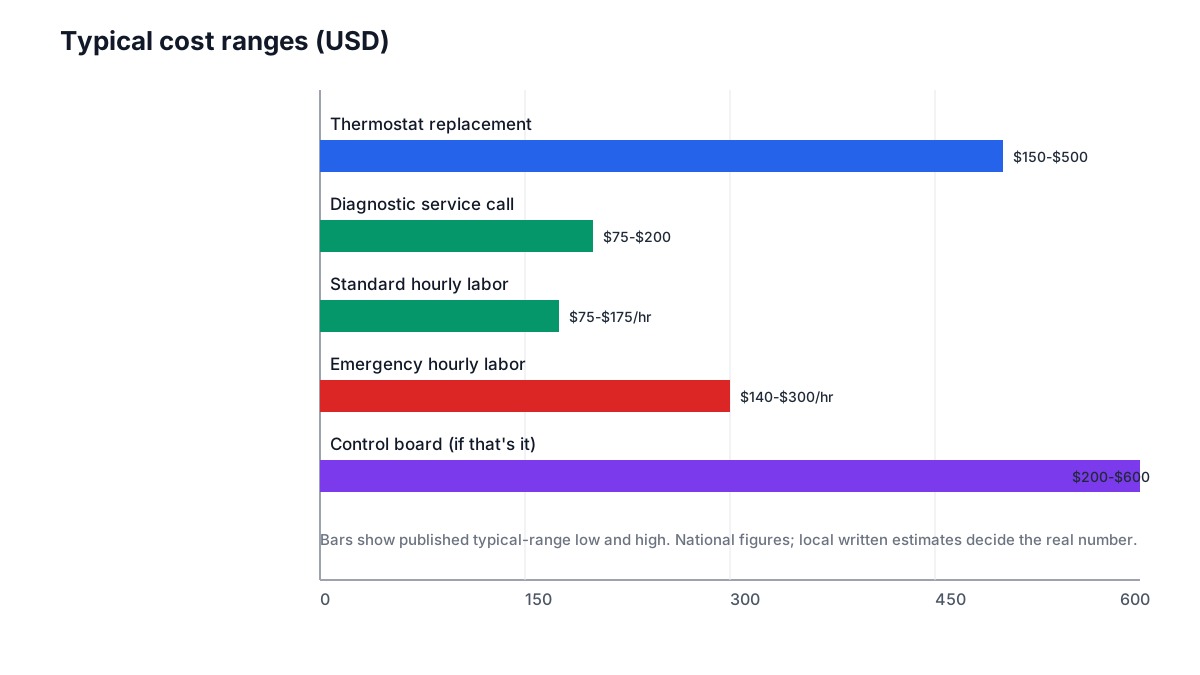
The honest answer is that most thermostat problems cost nothing beyond a set of batteries or fifteen minutes with a screwdriver. When an actual part fails, published national contractor cost surveys put thermostat replacement, parts and labor together, at $150 to $500, with the low end covering a basic programmable model and the high end covering a smart thermostat plus a professional compatibility check and, where needed, a C-wire run. A standard diagnostic visit runs $75 to $200 as a flat service call, with an hourly rate of $75 to $175 once a technician is actually working, or $140 to $300 an hour after hours.
Job type
Typical range
What moves the price
Source
Thermostat replacement (parts + labor)
$150-$500
Basic programmable vs. smart, whether a C-wire has to be run
Fixr 2026
Standard diagnostic/service call
$75-$200
Flat fee to have a technician look, regardless of the fix
HomeGuide 2025
Standard hourly labor
$75-$175/hr
Region, contractor overhead, complexity
Fixr 2026
Emergency/after-hours hourly labor
$140-$300/hr
Time of day, holiday, drive distance
HomeGuide 2025; Fixr 2026
Control board replacement (if that is the real fault)
$200-$600
Furnace brand, board availability
HomeAdvisor 2026
Furnace ignitor (a commonly misdiagnosed-as-thermostat cause)
$100-$250
Furnace brand, accessibility
HomeGuide 2025
How we got these numbers: the ranges above come directly from published national contractor cost surveys, not averaged or adjusted. They describe the country as a whole, and actual cost varies by region, how hard the wiring is to access, and what a technician finds once the wall plate or control board is actually open; only a technician's written estimate for the specific thermostat model and wiring situation is binding on price for any one house. A company unwilling to put that number in writing before starting work is a red flag covered in the hiring guide above.
The chart below lines the same ranges up side by side.Where thermostat repair money actually goes, based on published national contractor cost surveys.
Setting Up a Programmable or Smart Thermostat Correctly
Programmable thermostat setup goes wrong in a few predictable, fixable ways. The most common is a schedule left on factory defaults, holding the house at a temperature nobody chose because the actual household schedule was never entered. Close behind is a hold or vacation mode left active from months earlier, quietly overriding every scheduled change since. Both look exactly like a broken thermostat to someone glancing at the display without checking the mode.
A handful of setup steps prevent most of the "not working" calls that turn out to be settings, not hardware. Enter the actual weekly schedule instead of leaving a factory default in place. Confirm the mode is set correctly for the season: heat, cool, or auto. Check for a hold, vacation, or away setting that is silently overriding the schedule. On a smart model, complete the manufacturer's compatibility check against the wire labels before finishing installation, and confirm the Wi-Fi connection during setup rather than assuming it connected. A thermostat blank screen immediately after a firmware update is usually temporary; giving it two or three minutes before assuming failure avoids an unnecessary battery pull or reset.
Most manufacturers publish their own compatibility and setup documentation specific to each model, worth checking against the wiring found during removal of the old unit before assuming a smart thermostat and an older HVAC system simply will not work together.
Short Cycling: When the Problem Isn't the Thermostat at All
Thermostat short cycling, where heating or cooling switches on and off every few minutes instead of running a full cycle, is one of the most commonly misdiagnosed thermostat symptoms, because the thermostat is often just the messenger. A thermostat mounted too close to a heat register, in direct sun, or on an exterior wall can read a swing in temperature that the rest of the house is not actually experiencing, triggering a cycle that looks erratic but is really the thermostat doing its job with bad information.
The other common cause sits on the equipment side entirely: a dirty air filter restricting airflow, a low refrigerant charge, or an oversized system that satisfies the thermostat's setpoint too quickly to run a full cycle. None of those are thermostat problems, and no amount of thermostat wiring work fixes them. A furnace that short-cycles due to a failing flame sensor or a safety lockout is a separate, more urgent case covered in the safety section above, not a settings issue.
Re-mounting the thermostat away from direct sun and heat sources, changing a dirty filter, and comparing the thermostat's cycle length against a second, portable thermometer placed elsewhere in the room are the fastest ways to tell a thermostat-placement problem from a genuine equipment fault. If the cycling continues after those checks, the guide to blower motor and mechanical repairs covers the equipment-side causes in more depth.
Preventing the Next Thermostat Failure
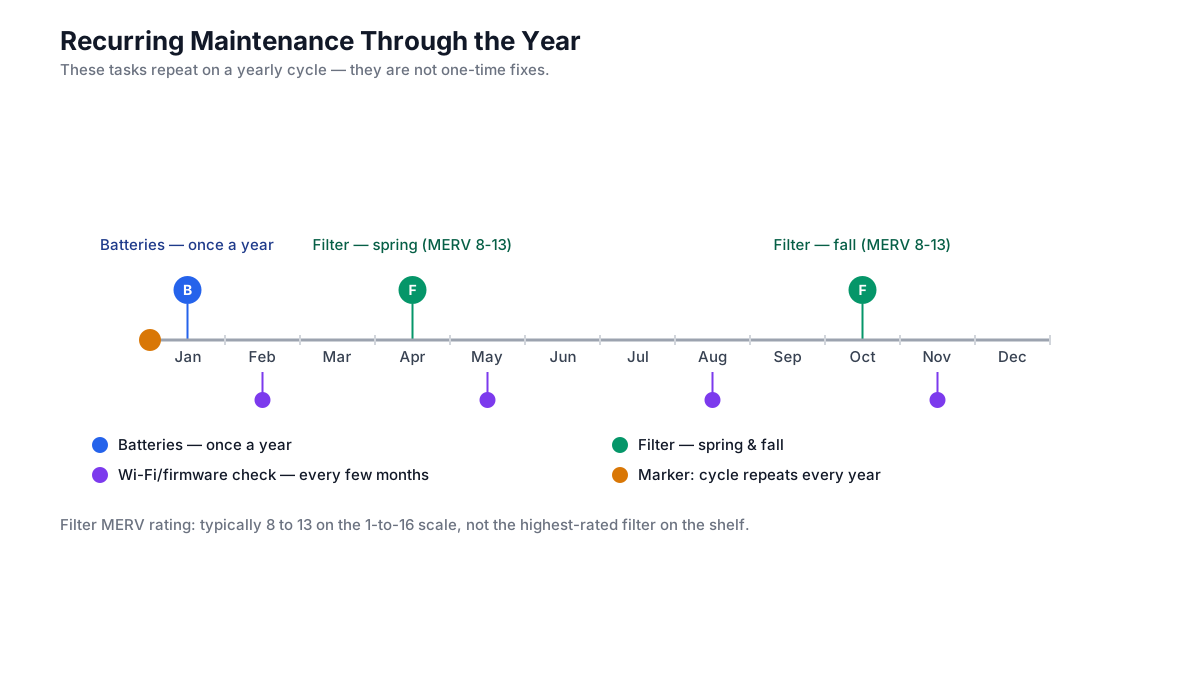
Most thermostat failures trace back to something predictable, not a random, unforeseeable event. Replacing batteries on a fixed schedule, once a year regardless of whether a low-battery indicator has lit up, avoids the single most common cause of a thermostat not working outright. Keeping the thermostat's small internal vents free of dust with an occasional soft-brush cleaning prevents the sensor drift that causes inaccurate readings and unnecessary short cycling.
A filter changed on a regular schedule, and matched to a MERV rating the system's blower can actually handle — typically 8 to 13 on the 1-to-16 MERV scale, rather than the highest-rated filter on the shelf — protects more than the furnace or air conditioner; restricted airflow strains the whole system in ways that eventually show up as thermostat symptoms, even though the thermostat itself never failed. The seasonal HVAC maintenance checklist covers the specific tasks worth doing each spring and fall, including the filter and airflow checks that prevent both equipment failures and the thermostat symptoms that mimic them.
For smart thermostats specifically, checking the Wi-Fi connection and firmware status every few months, rather than only after a problem appears, catches drifting connectivity before it turns into a blank screen at an inconvenient hour. The calendar below lays out that recurring schedule visually.Battery, filter and Wi-Fi checks repeat on a yearly cycle, not as one-time fixes, per the maintenance guidance above.
Regional Notes: Power Outages, Freeze-Belt Winters and Humid Summers
A thermostat not working after a power outage is common enough to deserve its own note. Most thermostats reset to a default program, or to an off or blank state, when household power returns after an outage, and a battery-backed model can behave differently from a fully line-powered one depending on how long the outage lasted. Checking the schedule and mode after any outage, storm, or breaker trip is worth doing even when the display looks normal, since a silently reset schedule can leave a house heating or cooling on the wrong pattern for days before anyone notices.
In freeze-belt climates, a thermostat failure during a hard freeze carries stakes a mild-climate failure does not: pipes along exterior walls or inside unheated crawlspaces can begin approaching the 32°F freezing point within hours once the furnace stops responding to calls for heat, turning a wiring fix into a race against frozen plumbing. The guide to what actually counts as an HVAC emergency covers that decision in more detail. In hot, humid regions, condensation inside an improperly sealed wall-mounted thermostat, or humidity swings that make a poorly placed unit cycle erratically, are the more common local pattern, closer to the short-cycling causes above than to a wiring failure.
Frequently asked questions
Why is my thermostat not working?+
The most common causes are dead batteries, a tripped breaker or blown low-voltage fuse, and a loose or miswired connection behind the faceplate. Those three account for most calls. A genuinely failed thermostat or a control board issue on the furnace side is possible but less common, and worth confirming only after power and wiring have been checked.
What should I do if the thermostat screen is blank?+
Replace the batteries first, even if the old ones test fine, then check the breaker panel and any service switch on the furnace or air handler. A blank screen is almost always a power problem rather than a broken circuit board, and both checks together take about five minutes.
Why is my thermostat not working even with new batteries?+
Fresh batteries that do not fix a blank screen point to the breaker, a blown low-voltage fuse on the equipment's control board, or a wiring problem rather than power at the thermostat itself. Check the breaker panel next, then confirm each wire is seated on its correct, labeled terminal behind the faceplate.
Why is my thermostat not working after a power outage?+
Most thermostats reset their schedule, and sometimes their mode, when power returns after an outage, and a battery-backed model can behave differently than a fully line-powered one. Check the schedule and mode settings first; the display often looks normal even though the program underneath has quietly reset.
How do I know if the thermostat is broken versus the furnace itself?+
If the screen is lit, the wiring is seated correctly, and the system still will not respond to a call for heat or cooling, the fault has likely moved to the equipment side. If the furnace or air handler makes no sound at all when the thermostat calls for heat, that points toward a control board or transformer issue rather than the thermostat.
Why does the furnace run but the thermostat won't control it?+
This pattern usually means the low-voltage wiring or a specific terminal connection has failed rather than the whole system. A wire that has come loose from the W or Y terminal can leave the furnace running independently while the thermostat loses the ability to start or stop it, which is a wiring check, not a furnace repair.
How much does it cost to replace a thermostat?+
Published national contractor cost surveys put thermostat replacement, parts and labor together, at $150 to $500. Basic programmable models land near the low end; smart thermostats plus a compatibility check and, if needed, a new common wire push toward the top of that range.
Do all smart thermostats need a C-wire?+
Most do, because the screen, Wi-Fi radio, and always-on processor need continuous power that a basic thermostat never required. Some models work around a missing common wire with a power-stealing method, but that workaround is a common source of rebooting, dimming, or dropped Wi-Fi connections.
Can I install a thermostat myself?+
Basic low-voltage thermostat wiring, batteries, and settings are within reach for most homeowners comfortable with a screwdriver and the power switched off first. Line-voltage thermostats, control board work, and anything inside the electrical panel beyond a single breaker reset belong to a licensed HVAC contractor.
Why does my thermostat show the wrong temperature?+
Placement is the usual cause: a thermostat in direct sun, near a heat register, or on an exterior wall reads a local temperature swing instead of the room's actual average, which can also trigger short cycling. Re-mounting it to an interior wall away from drafts and heat sources usually fixes the reading.