Most Rinnai tankless water heater repair calls trace back to three things: scale coating the heat exchanger, a blocked or frosted vent, or a flow sensor that isn't reading enough water movement. Check the error code on the remote first, clear the inlet filter and vent termination, then call a licensed plumber if the code points to ignition, flame, or the circuit board.
You reset the unit, the shower ran cold again, and now there's a two- or three-digit code sitting on the display that means nothing to you yet. That's the starting point for most people who end up here, whether the box on the wall says Rinnai or Navien. Tankless units are reliable once they're broken in and maintained, but they fail differently than the tank heaters most people grew up with, and the fix depends on which part of the system is struggling: the burner and ignition side, the water-flow and temperature-sensing side, or the venting that lets the unit breathe.
This guide works through what's actually wrong in rough order of likelihood, the checks you can run yourself before calling anyone, what a real repair or replacement costs based on published national data, and where the line sits between a homeowner fix and a job for a licensed plumber. It closes with the maintenance habit that prevents the largest share of these calls in the first place, and a straight answer on repair versus replace once a unit has failed more than once.
What's Actually Failing Inside a Rinnai or Navien Unit
A tankless water heater doesn't fail the way a tank does. There's no slow leak building up in a drip pan for months before anyone notices. Instead you get a unit that won't ignite, water that goes from hot to lukewarm mid-shower, or a code flashing on the remote that nobody in the house has ever seen before. If what's actually happening at your fixtures is water that never gets hot in the first place, rather than a code on the unit, our no hot water guide covers the whole-house side of that problem separately. The mechanism here is different from a tank heater too: instead of storing 40 or 50 gallons at temperature, a tankless unit has to sense flow the instant you open a tap, fire a burner (gas models) or heating elements (electric models), and hold a target temperature through a heat exchanger about the size of a shoebox.
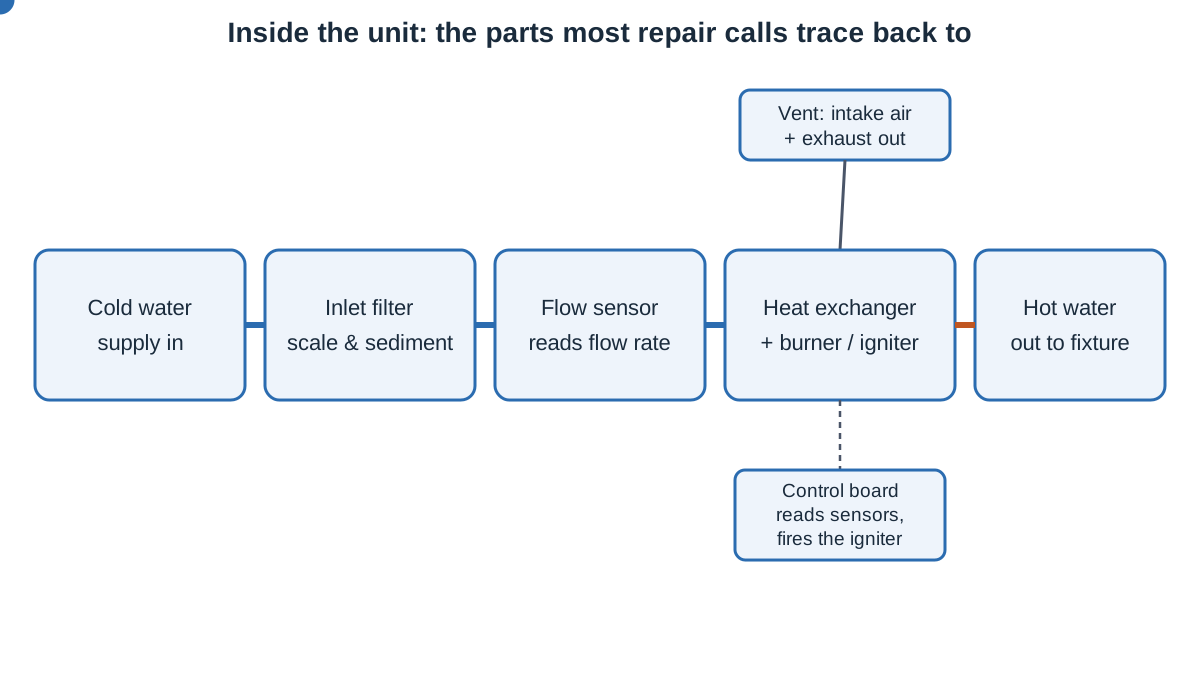
That heat exchanger is the part most Rinnai tankless water heater repair calls eventually trace back to, whether the visible symptom is an error code, a drop in flow, or a unit that short-cycles - turning on and off every few seconds instead of running steady. A tankless water heater not heating at all almost always points to power, gas supply, or ignition; one that's inconsistent, hot then lukewarm then hot again, usually points to flow or scale instead. Every part that makes tankless units efficient - the tight heat exchanger, the flow sensor, the electronic ignition - is also the part most likely to need attention a few years in. A tank heater with a bad thermocouple just runs cold; a tankless unit with the equivalent problem usually shuts itself down and reports why, which is inconvenient in the moment but genuinely useful if you know where to read it.
The Most Likely Cause, Ranked by How Often It Shows Up
Scale is the top offender almost everywhere the water runs hard, and it's the most common reason a Rinnai or Navien unit stops delivering steady temperature. Calcium and magnesium drop out of solution as water heats fast inside that narrow exchanger, and over a few years the mineral coats the passage until flow and heat transfer both suffer. Second most common: a flow sensor or inlet filter clogged with sediment, grit, or the fine plastic shavings sometimes left behind by a recent repipe - the unit reads too little flow to fire, even though water is clearly running at the fixture. Third: an ignition or flame-sensing fault, often the failure mode you'll see as a specific code rather than a vague symptom, where the igniter, the flame rod (the small sensor that confirms the burner actually lit), or the board reading it has gone bad.
Lower on the list but not rare: a blocked or frosted vent termination (common after an ice storm, or when firewood gets stacked too close to an exterior wall), a gas-supply issue upstream of the unit, or - on electric tankless models - a tripped breaker or an undersized circuit that never was sized right in the first place - these units draw far more current than the 15-amp or 20-amp circuit that runs a household outlet, and need a dedicated 240-volt breaker rather than a shared one. Sediment and scale together account for the largest share of service calls on units past the three-year mark, which is exactly why the maintenance section below matters more than any single repair tip.
The parts most Rinnai and Navien repair calls trace back to: the heat exchanger, the flow sensor and filter, and the igniter.
How to Diagnose It Yourself Before You Call Anyone
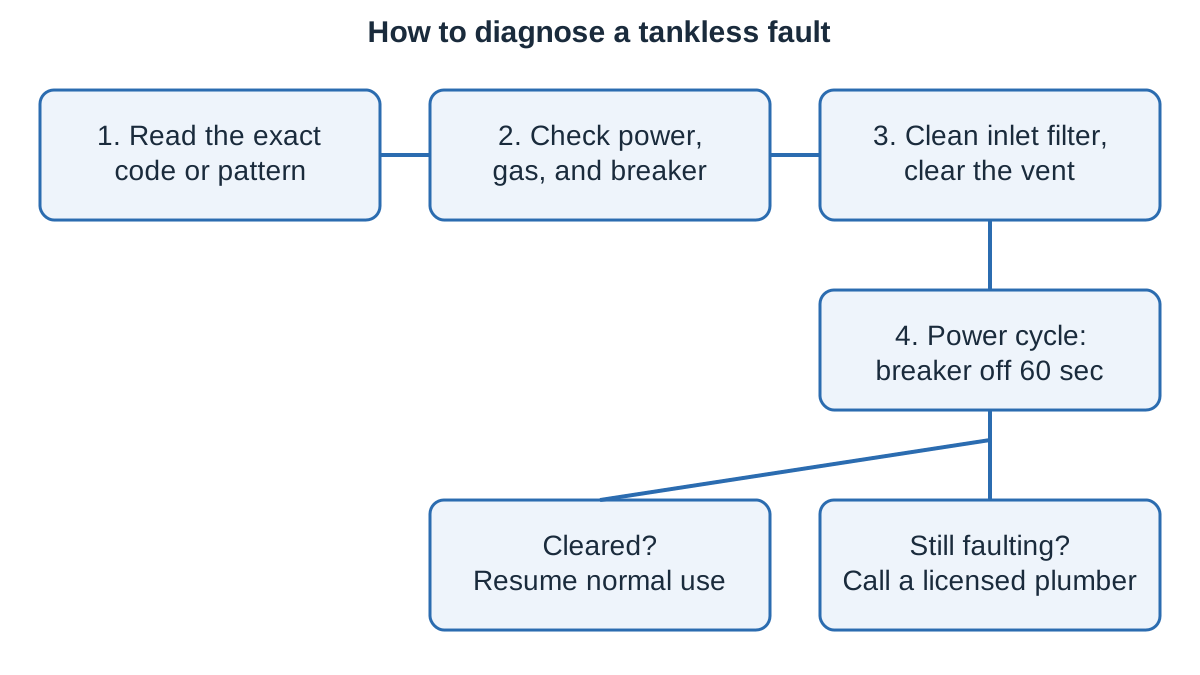
Start with the remote or control panel, not the unit itself. Most of what you need is already being reported to you, and the common mistake is skipping the code and jumping straight to guesswork. Work through it in this order:
Write down the exact code or blink pattern shown, not "some kind of error" - the literal digits or letters are what determine every step after this one.
Check the obvious power and gas basics: breaker not tripped, gas valve fully open, propane tank not empty, and, on electric models, the disconnect switch actually on.
Pull and rinse the inlet water filter - it's usually a small screen just before the unit, and a clogged one mimics half a dozen other faults.
Check the vent termination outside for anything blocking it: snow, a bird's nest, dead leaves, or a nearby dryer vent recirculating warm, moist air back into the intake.
Try a full power cycle: breaker off (or unplugged) for a full 60 seconds, then restart, since a one-time sensor glitch clears itself more often than people expect.
If the code returns immediately, or the unit won't fire at all after that, stop troubleshooting past this point - that's the line between homeowner-safe and licensed-plumber territory.
This sequence clears a real share of "no hot water" calls without a truck ever showing up, mainly because a dirty inlet filter and a blocked vent are both things a homeowner can safely check in under fifteen minutes. Everything past step six - opening the unit's casing, working on the gas train, or replacing a sensor - is where the job changes character. If what you actually find during this check is water pooling under or behind the unit rather than a fault code, that's a separate problem covered in our water heater leaking guide.
The order that resolves the most tankless faults without a service call.
Reading the Error Code Without Guessing
The tankless water heater error code on your Rinnai or Navien display is manufacturer-specific, and the honest answer is that we won't print a table here claiming one number always means the same exact thing across every model year - Rinnai and Navien have both revised their code lists across product generations, and the label inside your unit's front service panel, or the manual for your specific model, is the version that actually applies. What is consistent across nearly every tankless brand is the category a code falls into. Codes tied to ignition or flame sensing show up when the burner won't light or won't stay lit. Codes tied to water flow or the thermistor show up when the unit senses inconsistent flow, a scaled sensor, or a temperature reading that doesn't match what it expects. Codes tied to combustion air or venting show up when the intake or exhaust path is restricted.
Knowing the category gets you most of the way to a decision even before you've matched the exact digits: a flow-and-scale category code often clears with a descaling flush and a filter cleaning, while an ignition or board category code usually needs a plumber with the parts and diagnostic tools the manufacturer expects. If you're searching a specific code - people look up code 10, 11, 12, and 17 on Rinnai units constantly - match it against the label on your own unit rather than a generic list online, because a mismatch sends you chasing the wrong fix entirely.
What You Can Fix Yourself, and Where That Ends
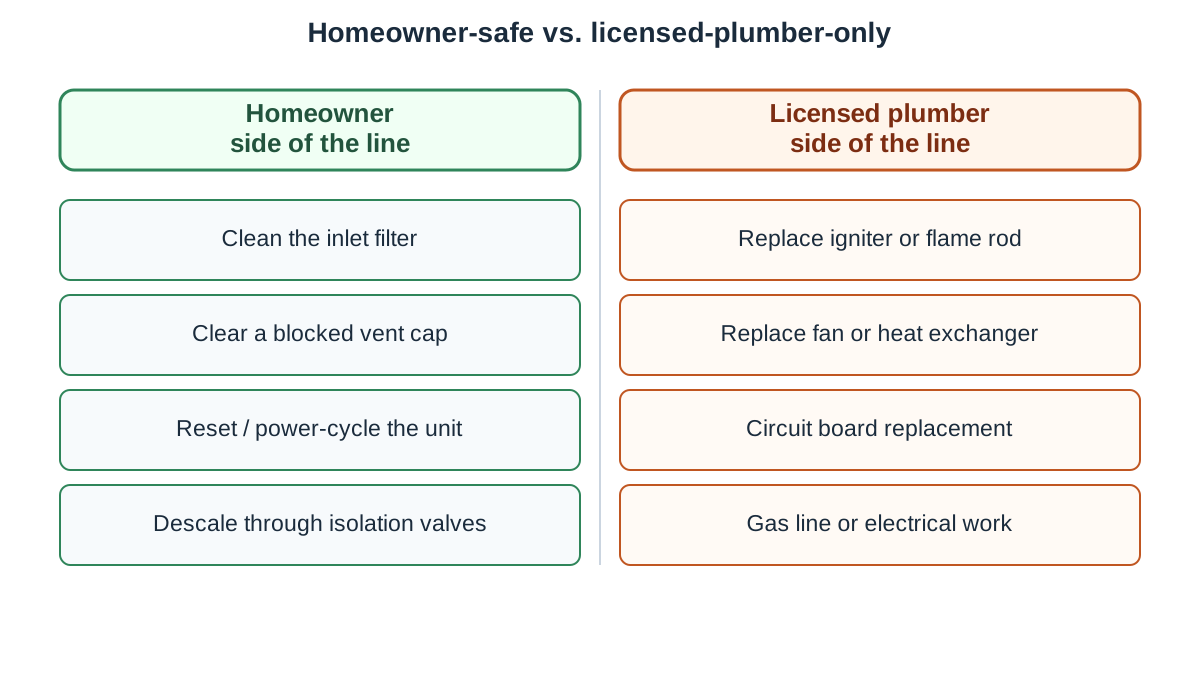
A short list of tankless repairs sit safely on the homeowner side of the line: cleaning the inlet filter, clearing a blocked vent cap, resetting the unit, and, if you're comfortable with basic plumbing, running a descaling solution through the isolation valves if your installer included them. Rinnai and Navien both sell service-valve kits specifically so a flush doesn't require disconnecting the unit's plumbing.
Everything else belongs to a licensed plumber, and that isn't a liability disclaimer dressed up as advice - it's genuinely how the trade splits the work. Opening the unit to replace an igniter, flame rod, fan, or heat exchanger means working inside a sealed combustion appliance with gas and venting connections that have to be resealed correctly, or you've created a carbon-monoxide risk instead of fixing a water-heater problem. Circuit board replacement requires matching firmware and settings to your specific installation - altitude, gas type, and flow settings all get programmed in, and a board swapped without resetting those can run the unit wrong for months before anyone notices. A plumber who does navien tankless repair or Rinnai work regularly will also carry accounts with the manufacturers' parts distributors, which matters because these parts aren't something you'll find on a hardware-store shelf.
The same split the trade uses: sealed combustion, gas, and electrical work stay with a licensed plumber.
What It Actually Costs to Fix or Replace One
Nobody publishes a national average specifically for "swap a Rinnai igniter" or "replace a Navien flow sensor," and we're not going to invent one here. What does exist, and what's genuinely useful, is solid data on what full tankless replacement runs nationally, which gives you a ceiling to measure any repair quote against. Treat every figure below as a researched range pulled from published cost surveys, not a quote for your address - the only number that actually binds anyone is a written estimate from a plumber who's inspected the unit in person.
Job type
Typical range
What moves the price
Source
Tankless water heater, fully installed
$1,400 - $3,900
Unit tier, whether venting or the gas line needs upsizing, permit fees
NerdWallet, 2025
Tankless-specific labor only
$600 - $1,900
Access to the unit, whether existing venting can be reused
HomeAdvisor, 2026
Tank-style replacement, for comparison
$600 - $2,500
Tank size, fuel type (gas vs. electric)
HomeAdvisor, 2026
Permit, where required
$25 - $300
Local jurisdiction
HomeAdvisor, 2026
All water heaters, national average
$1,293 average ($874 - $1,765 typical)
Mix of tank and tankless jobs nationally
Bob Vila, 2024
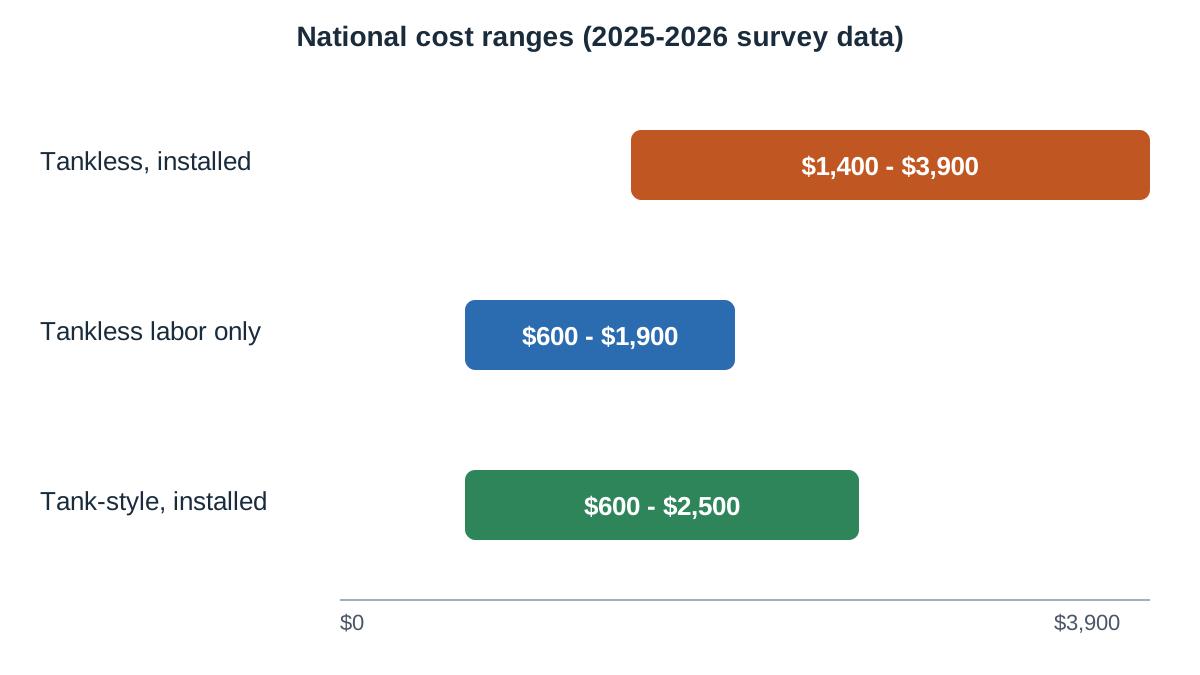
Use that $600-$1,900 tankless labor figure as your reference point for repairs, not the full replacement number. A straightforward descale-and-filter service call runs toward the low end of what any plumber charges for a visit at all. A heat exchanger or control-board swap, parts plus labor, climbs toward that labor range because the work involved - draining, isolating, resealing gas and venting connections, reprogramming settings - is comparable in scope to part of an install. Real cost still varies by region, how easy the unit is to reach, and what a plumber actually finds once the casing is open - a unit tucked behind finished drywall with corroded fittings costs more to open up than one on an accessible garage wall, even for the identical part. If a quote for a single-component repair starts approaching the full replacement number above, that's your signal to get a second opinion or seriously weigh replacing instead, which is exactly the decision the table further down walks through. For the fuller cost breakdown across tank and tankless options, our water heater replacement cost guide lays out the whole comparison.
How to read a repair quote against national replacement cost data. Sources: NerdWallet 2025, HomeAdvisor 2026.
When This Stops Being a DIY Problem
Gas and electric tankless units both carry real risk once you're past filter-cleaning and resets, and the risk isn't hypothetical. A gas unit with a cracked heat exchanger or a poorly resealed vent connection can put combustion byproducts, including carbon monoxide, into a space they were never meant to enter. An electric unit pulls enough amperage that a loose connection at the breaker or the unit's terminal block can arc and heat a wire jacket past its rating.
If you smell gas or hear a hissing sound near the unit, leave the area right away, don't flip any switches or light anything, and call your gas utility's emergency line or 911 from outside the house - that comes before any call to a plumber. Once the gas company or fire department confirms it's safe, a plumber can take over the repair, and a line like 888-854-0126 connects you to one that serves your area. The same stop-and-call rule applies if the breaker trips repeatedly no matter how many times you reset it, or you see soot or scorch marks around the vent connection: none of that is a wait-and-see situation.
Short of that, here's a practical rule: if the fix requires opening the sealed combustion chamber, disconnecting the gas line, working inside the electrical junction box, or reprogramming the control board's installation settings, hand it to a plumber. If the fix is filter, vent cap, reset, or descaling through the service valves, it's reasonably within homeowner territory. For a broader rundown of what actually counts as an emergency versus what can safely wait until morning, see our guide to when you need an emergency plumber. Either way, having the exact code and a description of when it started - after a cold snap, after a repipe, right after descaling - gets a plumber to a faster, more accurate diagnosis over the phone.
The Maintenance Schedule That Prevents Most of This
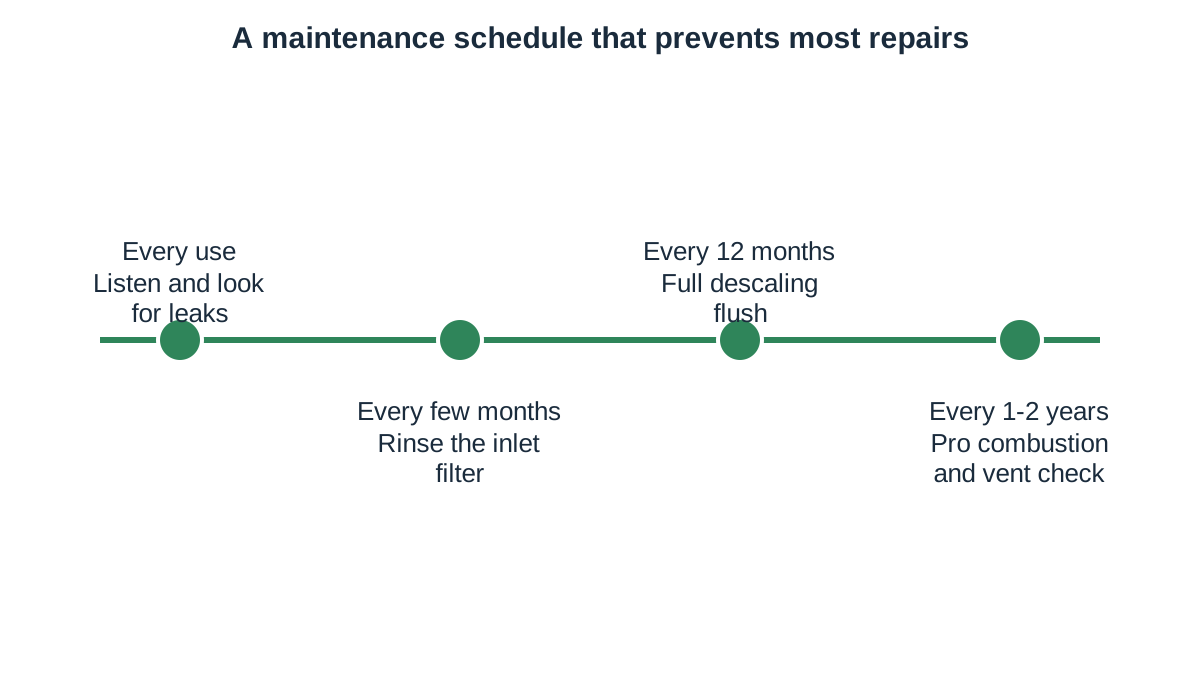
Tankless water heater descaling is the single task that does the most to keep a Rinnai or Navien unit out of the repair column entirely. In moderate-to-hard water, scale buildup inside the heat exchanger is gradual and largely invisible until it isn't: flow drops, temperature starts swinging, and eventually a flow-related code appears. A yearly flush with a commercial descaling solution, run through the isolation valves for roughly 45 minutes to an hour with the unit powered off, dissolves that buildup before it turns into a repair.
Basic tankless water heater maintenance beyond descaling is short: rinse the inlet filter every few months, more often if your water runs sediment-heavy, keep the vent termination clear of snow, leaves, and anything stacked against an exterior wall, and have a plumber do a combustion and venting check every year or two if the unit serves a household running showers, laundry, and the dishwasher on a busy, overlapping schedule - that kind of continuous demand ages a heat exchanger faster than light, spread-out use does.
Skipping descaling is the single most common reason a unit that should have another decade of service left starts throwing codes at year four or five. It's a cheap habit to keep and an expensive one to skip. For the rest of the house beyond the water heater, our seasonal plumbing maintenance checklist covers the tasks that prevent most other emergency calls too.
The maintenance rhythm that prevents most Rinnai and Navien repair calls.
Repair It Again, or Replace It This Time?
Tankless water heater lifespan isn't a number we're going to print here as if it applies to every unit - your manufacturer's documentation and warranty terms for your specific model are the real answer, and they vary by brand and tier. What we can tell you is the pattern that pushes a unit toward the "replace" side of the decision faster than its calendar age would suggest: skipped descaling, a heat exchanger that's already been repaired once, and household demand well above what the unit was originally sized for.
Situation
Lean toward
Why
Single component failing (igniter, flow sensor, fan), unit under roughly 8 years old
Repair
Component swaps are routine work and the unit likely has significant service life left
Heat exchanger scaled or already leaking, and descaling has been inconsistent
Replace
Heat exchangers are among the priciest single parts; on an older unit that cost approaches replacement anyway
Code repeats within days of a proper reset and a fresh descale
Repair, via an authorized service tech
A recurring code after real maintenance points to a sensor or board issue, not scale
Corrosion at fittings, repeated breaker trips, or a second major repair on an older unit
Replace
Stacking a second major repair onto an aging unit is a bet against more failures showing up soon
One more honest data point, pulled from the cost table above: full tankless replacement runs $1,400 to $3,900 installed. If a repair quote already sits at a third or more of that number on a unit that's shown two separate faults inside two years, replacement often wins on total cost of ownership even though it's the bigger number today.
Regional Notes: Hard Water, Cold Snaps, and Altitude
Where you live changes which failure mode shows up first. In hard-water regions - much of the Southwest, Texas Hill Country, and pockets of the Midwest - scale is the dominant cause, and a unit that would go three years between flushes elsewhere might need one every twelve months. A whole-house softener ahead of the tankless unit meaningfully slows this, though it's a separate purchase from the water heater itself.
In the freeze belt - the Upper Midwest, New England, and mountain regions - the failure pattern shifts toward vent problems and, on outdoor-rated units, freeze protection. Snow load against an exterior vent cap, or a freeze-protection heating element that failed quietly over the summer and only gets discovered on the first hard freeze of the season - the point where unprotected water inside the unit starts turning to ice at 32°F and can split a fitting or crack the heat exchanger - both show up as sudden "no heat" calls in the coldest months rather than gradual scale symptoms. Units installed at meaningful elevation need combustion settings adjusted for altitude at install; if that step was skipped, or the unit was later serviced by someone unfamiliar with the original setup, you can see intermittent ignition faults that look identical to a bad igniter but aren't.
None of this changes the diagnostic order above - code first, filter and vent second - but it does change which cause to suspect first when you're staring at a blinking code and guessing.
How to Choose a Plumber for Rinnai or Navien Repair
Tankless units aren't universal the way a tank swap basically is. Not every plumber who's competent with a 50-gallon tank has done a Rinnai tankless water heater repair or worked a Navien board reset recently, and the parts, diagnostic steps, and manufacturer-specific settings genuinely differ. When you're calling around, ask directly whether the company services tankless units regularly, whether they carry common parts (igniters, flow sensors, filters) on the truck, and whether they're an authorized service provider for your brand - that status can matter for warranty coverage on parts still under manufacturer warranty.
A state plumbing license and current proof of liability insurance are baseline, non-negotiable requirements, not extras - verify the license is active with your state's contractor licensing board and confirm the insurance hasn't lapsed before work starts, not after. A written estimate before any work begins should show the suspected cause, the parts involved, labor cost, and whether the diagnostic fee applies toward the repair if you go ahead. Red flags worth walking away from: a quote given over the phone with no unit inspection, pressure to replace when a single component is the stated cause, or a technician who can't explain what the error code meant in plain language. Our broader guide to choosing a licensed plumber covers license lookups and insurance verification in more depth than tankless work alone requires.
If you'd rather start with a phone call than an inspection, a line like 888-854-0126 can connect you with a plumber that serves your area for a look at the unit and a written estimate before anything gets ordered or replaced.
Frequently asked questions
How do you reset a Rinnai tankless water heater?+
Most Rinnai units reset from the remote control panel itself - there's usually a dedicated reset button, or you hold the power button for several seconds until the display clears. If the code returns immediately after reset, cycling power at the breaker or unplugging the unit for a full 60 seconds is the next step, and if the same code comes back a third time, that's a sign the problem needs a licensed plumber rather than another reset.
What is the warranty on a Rinnai tankless water heater?+
Warranty length depends on the specific model and whether it was installed by a licensed professional and registered with the manufacturer, and it typically differs for the heat exchanger versus other parts and labor. Check the label inside the unit's front service panel or your installation paperwork for the exact terms that apply to your unit, since a figure quoted elsewhere may not match your model year.
Do Rinnai tankless water heaters require maintenance?+
Yes - tankless units need more regular attention than most people expect from a "no-tank" system. An annual descaling flush and periodic inlet-filter cleaning are the core tasks, and skipping them is the biggest reason units develop flow and temperature problems years before they should. A plumber-performed combustion and venting check every year or two rounds out a reasonable schedule.
How much does it cost to flush a Rinnai tankless water heater?+
There's no published national figure specifically for a descaling flush in the data available here, so we won't print an invented one. What's known is that it's a routine, relatively quick service call, well under the cost of any parts-and-labor repair, and a price a plumber quotes you is worth checking against that context rather than accepted blind. Get it in writing before the visit.
What does error code 11 mean on a Rinnai tankless water heater?+
Error code 11 on most Rinnai tankless models points to an ignition failure - the burner isn't lighting. Rinnai has changed exact code definitions across different product generations and series, so confirm the meaning against the label inside your unit's front cover or the manual for your specific model before assuming the fix, then check gas supply, venting, and the igniter in that order.
How much does it cost to replace a Rinnai tankless water heater?+
Full tankless water heater replacement, including labor, typically runs $1,400 to $3,900 nationally, with labor alone falling between $600 and $1,900 depending on access and whether venting needs rework. Where your specific job lands in that range depends on the unit tier you choose, whether the gas line or vent needs upsizing, and local permit costs - a written estimate settles the real number.
How long do Rinnai tankless water heaters last?+
There's no single honest number to print here, since service life depends on your specific model, water hardness, and how consistently it's been descaled - that's information your manufacturer's documentation for your unit provides, not a generic industry figure. What reliably shortens service life is skipped maintenance, unaddressed scale buildup, and demand well beyond what the unit was sized for.
Where is the reset button on a Navien tankless water heater?+
On most Navien units, the reset control lives on the front display panel itself, alongside the temperature and mode buttons - check your specific model's panel layout in the manual, since Navien has used a few different panel designs across its lineup. If a straightforward panel reset doesn't clear the fault, a full power cycle at the breaker for 60 seconds is the next step.
Is a Navien tankless water heater worth it?+
That depends on your household's hot water demand and how consistently you'll keep up with descaling, more than on the brand name itself. Navien and Rinnai are both established manufacturers in the US tankless market, and either performs well when it's sized correctly for the home and serviced on schedule; a unit that's undersized or neglected will disappoint regardless of brand.
How long do Navien tankless water heaters last?+
As with any tankless brand, there's no single figure that applies to every unit - your model's documentation and how well it's been maintained matter more than a generic average. Consistent descaling, a clean inlet filter, and an unobstructed vent are the three habits that most reliably keep a Navien unit running toward the long end of its designed service life rather than the short end.
What is the warranty on a Navien tankless water heater?+
Warranty terms vary by model and by whether the unit was professionally installed and registered, similar to Rinnai's structure, with different coverage lengths for the heat exchanger versus other parts and labor. The label inside the unit or your installation paperwork has the terms that actually apply to your unit - that's the figure to rely on, not a number quoted from a different model.
How do you clean a Navien tankless water heater?+
Routine cleaning means rinsing the inlet water filter every few months and running a descaling solution through the isolation valves, if your installer included them, roughly once a year, longer between flushes if your water is naturally soft. The exterior cabinet just needs a damp cloth; avoid spraying water directly at the venting or electrical connections while you clean around the unit.