A water heater burst flooding the area around it means the tank has ruptured or a fitting has failed. Cut power at the breaker or gas at the shutoff, then close the cold-water valve on top of the tank, or the main shutoff if needed. Dry the space within 24 to 48 hours. A ruptured tank almost always needs full replacement, not repair.
You hear a hiss, then a sound like a bathtub draining straight into the floor, and by the time you reach the utility closet or basement there is already an inch of water spreading toward the drywall. A water heater burst flooding a laundry room or basement is one of the most common calls a restoration company takes, right alongside burst supply lines, because the tank sits full of water around the clock and nobody checks on it until something goes wrong.
This guide walks through what to shut off first, how to tell whether the tank is repairable or a total loss, what drying and replacement realistically involve, and how a water heater burst insurance claim usually gets decided. Every figure here traces to a named cost survey or federal source listed at the bottom of the page. Where the data does not cover something, this guide says so instead of guessing at a number.
What Actually Happens When a Water Heater Bursts
"Burst" sounds sudden, and sometimes it is: a tank wall rusted through from the inside can let go all at once, dumping dozens of gallons across the floor in under a minute. More often, a water heater burst is really a slower failure, a seam that finally gives out, a fitting that cracks, or a relief valve that starts discharging and will not stop, and the flooding builds over a few hours rather than a few seconds. Either way the practical problem is identical: water keeps coming until a valve gets closed, and it keeps coming from two directions if the cold-water line feeding the tank is still open.
A standard residential tank holds dozens of gallons, and that is only the water already inside it. Leave the cold-water inlet open after a rupture and the tank refills nearly as fast as it drains, so what looks like a single spill turns into a continuous leak until the supply line is shut. That single fact separates a contained mess from a water heater flooded basement soaking through drywall, subfloor, and anything stored nearby.
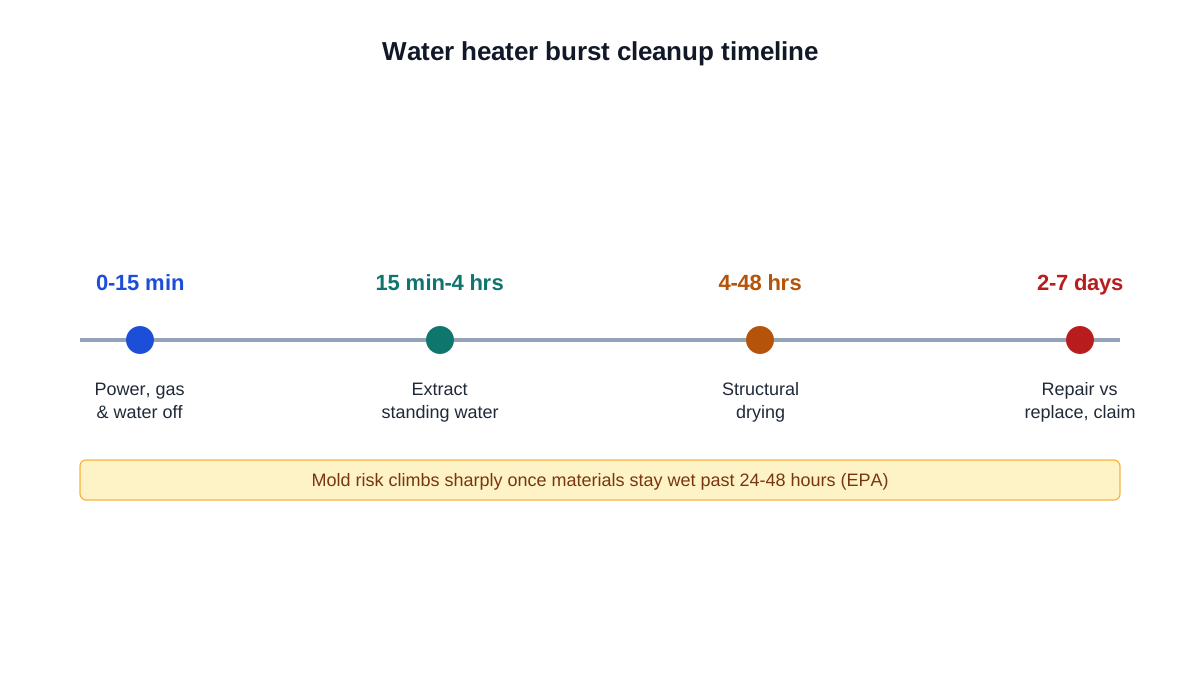
The first 48 hours set the mold risk; what happens after that sets the repair bill.
Gas and electric units fail the same mechanical way, but the safety picture around each is different, covered in detail later in this guide. For now, the point that matters is speed: a tank that has already ruptured will not seal itself, and every extra minute before the valves close adds water to the cleanup and, often, materials to the repair bill. Our step-by-step restoration process guide covers what a crew actually does once they arrive.
Why Water Heaters Burst or Leak in the First Place
Homeowners searching why do water heaters burst are usually looking for the one cause, but restoration crews and plumbers see a handful of repeat offenders, roughly in this order of frequency.
Sediment and internal corrosion
Sediment buildup is the most common root cause. Minerals in tap water settle to the bottom of the tank over years of heating cycles, insulating the steel from the burner or element above it, making the heater work harder and corroding the tank floor from the inside where nobody can see it happening. By the time rust-colored water or a rumbling, popping sound during heating shows up, the tank is often already thin in spots.
Age
Every year a tank sits full of hot water is another year of stress on the glass lining and steel shell. An older unit that has never been flushed or had its anode rod checked is carrying more risk than its age alone suggests, which is part of why so many failures happen without warning on a unit the household assumed was simply "still working."
Relief valve and pressure issues
The temperature-and-pressure relief valve exists to vent the tank if pressure or heat climbs past a safe limit. A valve that sticks open, or a tank that keeps hitting that limit because of a failed thermostat or a closed plumbing system with no expansion tank, can flood a utility room just as effectively as a ruptured shell, even though the tank body itself is fine.
Lower on the list but still real: high static water pressure with no pressure-reducing valve stressing every joint in the system, loose or corroded fittings and nipples at the top of the tank, and, occasionally, a manufacturing defect or shipping damage that shows up as a leak soon after installation rather than years into service.
The First Hour: Shutdowns Before Cleanup
What you do in the first few minutes decides how much of this becomes a cleanup job versus a full room rebuild. If the unit is electric, do not step into standing water near it until the breaker is off, since any wet floor near a plugged-in appliance should be treated as energized until proven otherwise.
Cut power at the breaker for an electric unit, or turn the gas control valve to OFF for a gas unit, and do not relight the pilot yourself if you smell gas.
Close the cold-water shutoff valve on top of the tank; if it will not turn, close the main water shutoff for the house instead.
Move anything on the floor nearby that reacts badly to water: stored boxes, drywall stock, pet bedding, extension cords.
Start pulling standing water with a wet/dry shop vacuum or a push broom toward a floor drain.
Photograph the tank, the failed fitting or valve, and the waterline height on nearby walls before you dry anything, for the insurance file.
Set up fans and a dehumidifier if you own one, and open a window if outdoor humidity is lower than indoor humidity.
If the water is still coming in after those steps and you cannot get it to stop, call 888-407-9931 and describe what you see; that line reaches a restoration company that serves your area and can talk you through what to do while help is on the way. Skip the towels and shop vacuum until the source is confirmed off, since extracting water while more is still flowing just wastes the hour that matters most.
Is It Repairable, or Does It Need Replacing?
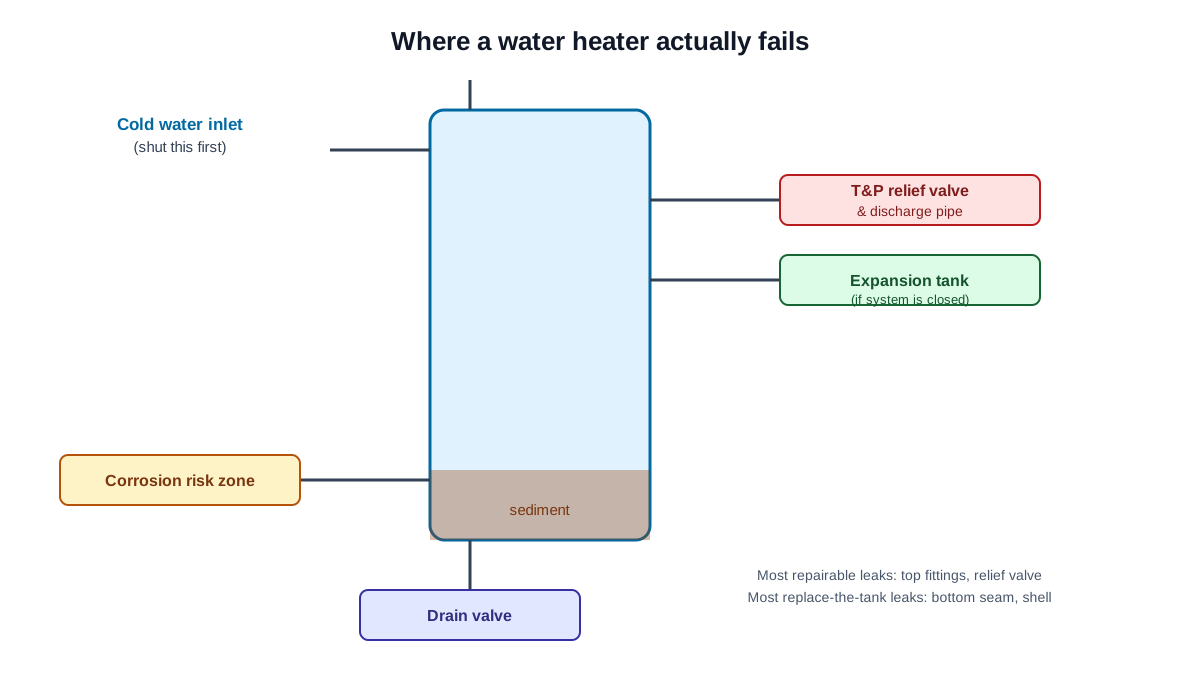
Where the water is actually coming from tells you almost everything. A leak at a fitting, valve, or connection is usually a repair. A leak from the tank body itself is not, because a steel tank does not get resealed once the shell or a weld seam has failed; the fix is a new unit.
Where it is leaking
What it usually means
Repairable or replace
Water pooling directly under the tank, rust visible on the shell
The tank itself has corroded through
Replace; a leaking tank body cannot be sealed
Dripping or spraying from the relief valve discharge pipe
Valve stuck open, or excess pressure or temperature
Often repairable; replace the valve and check for an expansion tank
Water at a fitting, nipple, or union near the top
Loose or corroded connection
Usually repairable; fitting replacement
Water from the drain valve at the bottom
Worn or not fully closed drain valve
Usually repairable; drain valve replacement
A bulge in the tank shell, or the unit visibly shifted or "blew up"
Catastrophic pressure failure
Replace, and have a plumber check venting and the relief system before the new install
Where the leak is tells you whether the fix is a fitting or the whole tank.
A homeowner asking can a flooded water heater be repaired is often really asking whether the flooding itself hurt the unit further. Usually not, water on the outside of the tank does not damage the tank; the failure that caused the flood is the thing that needs fixing. What the flooding does put at risk is everything around the tank: flooring, drywall, and anything stored on the floor of a utility closet or basement.
Drying Out the Flooded Area the Right Way
Water from a burst tank starts as Category 1 water under the ANSI/IICRC S500 restoration standard, the same classification given to a supply-line break, because it is tap water before it hits the floor. That classification does not hold forever. The same standard treats clean water left standing more than 24 to 48 hours, or water that has picked up contaminants from a dirty floor or nearby debris, as having moved into a dirtier category that needs different handling. That is the practical reason speed matters more than almost anything else with water heater leak damage: the clock on category does not wait for you to find a contractor.
The US EPA puts a number on the same urgency: dry water-damaged materials within 24 to 48 hours and hold indoor humidity below 60 percent, ideally between 30 and 50 percent, to keep mold from taking hold. A homeowner with a wet/dry vacuum, a few box fans, and a rented dehumidifier can often hit that window for a contained spill under about 10 square feet, the EPA's own do-it-yourself threshold for mold cleanup. Beyond that footprint, or if the water heater leaking went unnoticed and sat under flooring or behind drywall for more than a day, professional extraction and structural drying equipment does a faster and more thorough job than fans and an open window. Our guide to drying out water damage yourself covers the equipment and technique in more detail.
Replacing the Water Heater: DIY Limits and Hiring the Right Pro
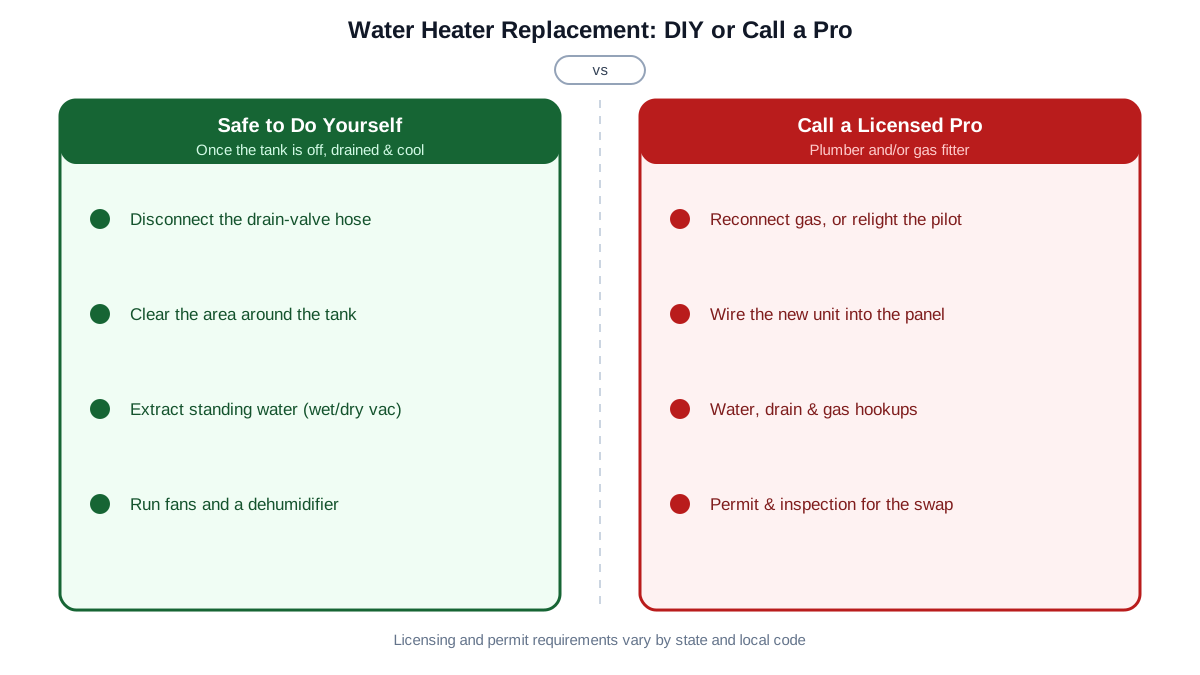
Some of this is safe to handle yourself. Once the tank is off, drained, and cool, a homeowner can typically disconnect a garden hose from the drain valve, clear the area, and do the wet-vacuum and fan work described above without any special license. What you should not do yourself: reconnect a gas line, relight a gas water heater's pilot after a suspected leak, or wire a new electric unit into the panel. Most states require a licensed plumber for the water and drain connections and a licensed gas fitter, sometimes the same plumber under a gas-work license, for the gas line, and most local codes also require a permit and inspection for a full swap, plus an expansion tank where the home has a check valve or pressure-reducing valve on the main.
When you are ready to hire, verify the plumber's license status with your state's licensing board and confirm they carry current liability insurance before work starts, and get the make, model, and capacity of the replacement tank in writing so you can actually compare bids instead of guessing at what each quote includes. If the flooding is bad enough that you also need extraction and drying alongside the replacement, a call to 888-407-9931 reaches a restoration company that serves your area and can explain what a drying crew will handle versus what stays with the plumber. Our guide to choosing a water damage company covers the licensing and insurance questions worth asking either kind of pro.
Once the old tank is drained and cool, cleanup is DIY; gas, wiring, and code sign-off are not.
What It Costs
There is no single national price for cleaning up after a water heater bursts, because the number depends on how much water moved, how long it sat, and how much of the floor and walls got wet before anyone noticed. The ranges below come from several published national cost surveys rather than one source alone, since individual estimates vary by several hundred dollars for the same job. These are researched ranges pulled from those surveys, not a quote for your specific job, and only a written estimate from a local licensed contractor is binding once you are ready to hire. Actual cost also varies by region, access to the water heater, and how much damage turns up once work opens up the walls or flooring.
Job or task
Typical range (national)
What moves the price
Source
Whole-job water damage restoration, typical spend
$1,200 - $6,369, national averages $3,000 - $3,868
Category of water, square footage, days before drying started
HomeAdvisor, HomeGuide, Fixr, Bob Vila
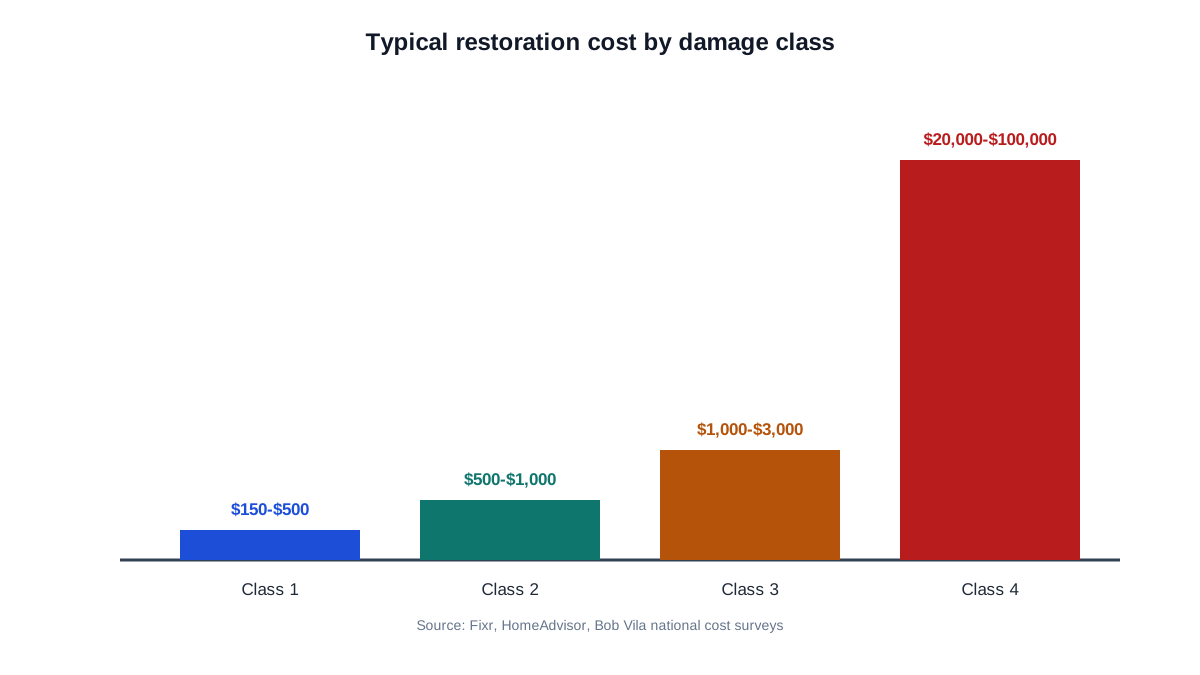
Class 1 damage (small, low-absorption area)
$150 - $500
Limited wet footprint, low-absorbency materials
HomeAdvisor, Fixr, Bob Vila, HomeGuide, Today's Homeowner
Class 2 damage (whole room, carpet involved)
$500 - $1,000
Carpet and cushion soaked, larger wet area
Fixr, HomeAdvisor
Class 3 damage (water reached walls or ceiling)
$1,000 - $3,000
Insulation and framing soaked, not just flooring
Fixr, HomeAdvisor, Bob Vila, Today's Homeowner
Class 4 damage (specialty drying, deep saturation)
$20,000 - $100,000
Hardwood, plaster, or concrete that trap moisture and need extended drying
Fixr, HomeAdvisor, Bob Vila
Drywall replacement
$300 - $850
Amount of wall cut out, whether insulation behind it is also soaked
HomeAdvisor
Mold remediation, if drying is delayed
$1,100 - $9,000, national averages roughly $2,225 - $3,500
Square footage affected, whether it reaches HVAC ductwork
Fixr, Bob Vila, HomeAdvisor
Sump pump install (prevention, not part of this repair)
$640 - $2,000, average near $1,200
Pump capacity, battery backup, existing drainage
HomeAdvisor
Class 1 is a contained spill; class 4 is deep saturation in materials that trap water.
How we got these numbers: HomeAdvisor puts the national average whole-job restoration cost at $3,868 across a typical range of $1,383 to $6,369; HomeGuide lists $2,000 to $6,000; Fixr reports a $3,000 average across $1,200 to $5,000; Bob Vila cites a $3,455 average across $1,305 to $5,707. None of those figures include the replacement water heater itself. Tank price, venting type, and local labor rates vary too widely for a single national number to mean much for that part of the job, so treat any generic average water heater replacement cost you find online as a starting point only, and get a written estimate from a local licensed plumber before committing.
Water Heater Burst Insurance Claims: What Usually Gets Covered
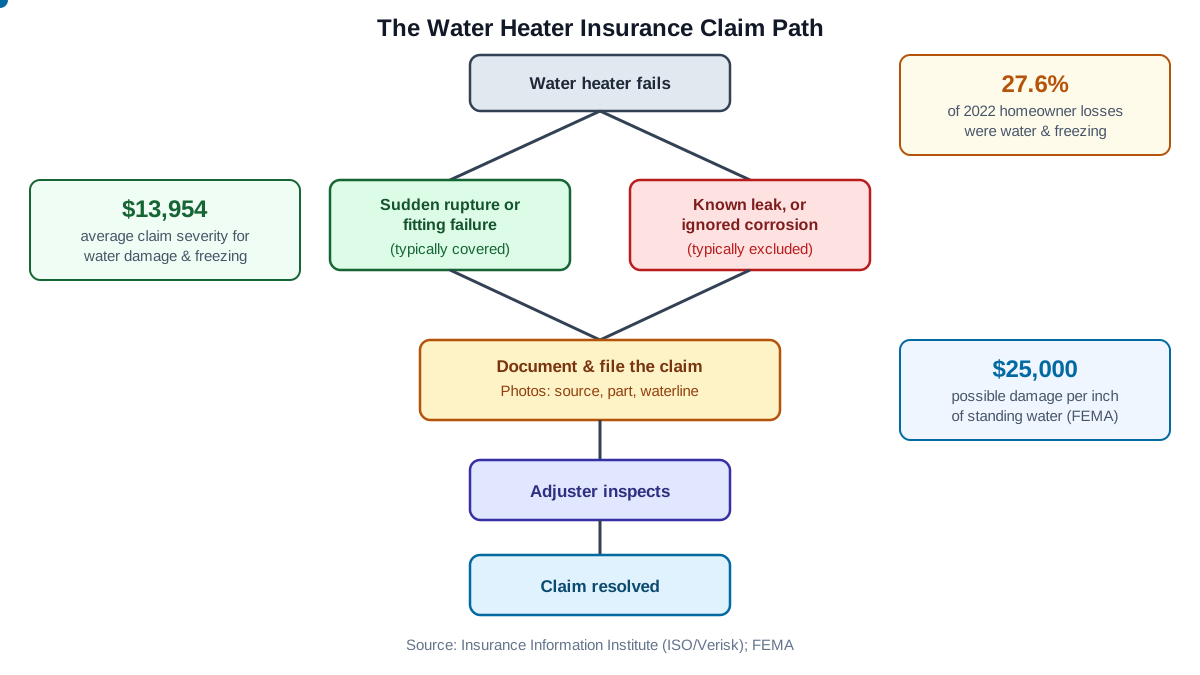
Most water heater burst insurance questions come down to one distinction: was the failure sudden and accidental, or was it something a homeowner could have caught and did not? A standard HO-3 homeowners policy typically covers sudden tank ruptures and fitting failures, along with the resulting damage to floors, drywall, and belongings. What most policies exclude is damage traced to long-term neglect: a tank that had been visibly leaking for months, corrosion the homeowner already knew about, or damage that happened because a routine maintenance item, like a failed drain valve, was never addressed.
Water damage and freezing losses are not rare. According to the Insurance Information Institute, citing ISO, a Verisk Analytics business, water damage and freezing accounted for 27.6 percent of homeowners insurance losses in 2022, the second-largest cause after wind and hail, with an average claim severity of $13,954 and a claim frequency of 1.61 per 100 house-years. A separate analysis citing the same Triple-I data found that roughly one in every 67 insured homeowners files a water-damage-related claim in a given year, averaging around $15,400. FEMA puts the same risk in blunter terms: just one inch of standing water can cause roughly $25,000 in damage, which is why documentation, photos of the source, the failed part, and the waterline, matters as much as the repair itself once you file.
File the claim once the emergency is handled, not before, but do not wait days to do it. Most insurers want notice quickly and will send an adjuster to inspect before major repairs start, though drying the space out right away to limit mold is generally expected of you regardless of the adjuster's schedule. Keep the failed fitting, valve, or a photo of the tank's rating plate until the adjuster has seen it or told you it is fine to discard. Our water damage insurance claims guide walks through the adjuster process end to end.
Sudden failures are usually covered, neglect usually is not; figures from the Insurance Information Institute (ISO/Verisk) and FEMA.
Safety First: Gas, Electric, and When to Call for Help
If you smell gas near a leaking or failed gas water heater, leave the house immediately and call the gas utility or 911 from outside; do not flip light switches, use your phone inside, or attempt to relight the pilot yourself. A damaged or improperly reconnected vent on a gas unit can also let carbon monoxide back into the house, so a working CO detector near the utility area is worth the ten-dollar battery check twice a year.
For an electric unit, the danger is simpler and just as real: standing water near a live circuit. Cut power at the breaker before anyone wades through water near the heater, and if the panel itself is only reachable by walking through standing water, that is a job for someone with the right equipment, not bare feet and a flashlight. Call for professional help rather than improvising when any of these apply: the water volume is large enough that it is running into a finished space below, a ceiling below the unit is sagging or stained, the discharge smells like sewage rather than clean water, or anyone in the household is especially sensitive to mold, including infants, older adults, or anyone with asthma or a compromised immune system.
Preventing the Next Burst
A water heater pan with a drain line routed to a floor drain or outside the house catches a slow failure before it ever reaches the floor, and it is inexpensive enough that many local codes already require one for tanks installed above living space. A leak-detection shutoff device takes that further, closing the water supply automatically the moment it senses moisture, which matters most for anyone who travels or has a finished basement below the unit.
An expansion tank is not optional in homes with a check valve or pressure-reducing valve on the main line; without one, normal thermal expansion during heating cycles has nowhere to go except the relief valve, which is exactly the slow-flood scenario described earlier in this guide. Pair that with a pressure-reducing valve if incoming water pressure runs high, since high static pressure stresses every joint on the tank, not just the relief valve.
On the maintenance side: flush sediment from the tank periodically, check or replace the anode rod on the schedule the manufacturer lists, and treat rust-colored water, a rumbling or popping sound during heating, or any dampness at the base of the tank as an early warning rather than something to watch for another season. A tank that shows any of those signs is a candidate for planned replacement on your own timeline, which is a very different experience than a flooded utility room on a random Tuesday. Our room-by-room prevention checklist is worth working through once a year for the rest of the house too.
Regional Notes: Freeze Belt vs. Humid and Hurricane-Prone Climates
Freeze-belt states rarely see the tank itself freeze, since it usually lives in a heated space, but the pipes feeding it do not get the same protection. A frozen supply line can cut off the cold-water inlet without touching the tank, and cold climates also see more thermal-expansion-driven relief-valve discharge, because closed plumbing systems with backflow preventers or pressure-reducing valves are more common there by code, which is exactly the slow-flood pattern covered above rather than a dramatic rupture.
Humid and hurricane-prone regions carry a different risk. The EPA's humidity guidance matters even more here, since ambient indoor humidity is already closer to that 60 percent ceiling before a water heater even fails, leaving a smaller margin before mold takes hold. Homes with the unit in a garage, crawl space, or ground-level utility closet in a flood-prone area face a second layer of risk on top of the appliance failure itself: FEMA notes that over 40 percent of National Flood Insurance Program claims come from properties outside mapped high-risk zones, a reminder that a standard homeowners policy and a flood policy cover different perils, and a water heater failure during a storm can involve both if outside floodwater and internal tank water mix.
Frequently asked questions
Can a flooded water heater be repaired?+
It depends on where the leak is coming from, not on the flooding itself. Water on the outside of the tank does not damage the unit further; the failure that caused the flood is what needs fixing. A leaking fitting, valve, or connection is usually repairable, while a leak from the tank body itself almost always means full replacement.
What happens if a water heater gets flooded from outside, like a basement flood?+
A standard gas or electric water heater is not designed to sit in floodwater. If the burner, control valve, or wiring on an electric unit was submerged, do not relight or restart it until a licensed plumber or electrician inspects it, since components rated for splashes are not rated for full submersion.
Why do water heaters burst?+
Sediment buildup and internal corrosion are the most common cause, followed by age, a stuck or failing relief valve, thermal expansion in a closed plumbing system with no expansion tank, high static water pressure, and loose or corroded fittings. Rust-colored water or a rumbling sound during heating are early warning signs worth acting on.
What should I do when a water heater bursts?+
Cut power at the breaker or gas at the shutoff first, then close the cold-water valve on top of the tank, or the home's main shutoff if that valve will not turn. Photograph the damage before you dry anything, start pulling standing water, and call a restoration company if the flow will not stop on its own.
Why is my water heater leaking from the top?+
A leak at the top usually traces to a loose or corroded fitting, nipple, or union, or to the temperature-and-pressure relief valve discharging because of excess pressure or heat. Both are typically repairable without replacing the whole tank, though a relief valve that keeps discharging is worth having checked rather than ignored.
Can high water pressure damage a water heater?+
Yes. Static water pressure that runs consistently high stresses every fitting and joint on the tank, including the relief valve, and can shorten the life of the unit well before sediment or age would otherwise cause a failure. A pressure-reducing valve on the main line is the standard fix where incoming pressure is high.
Will turning off the water hurt the water heater?+
No, closing the cold-water supply valve to stop a leak or flood does not damage the tank. Just remember that a gas or electric water heater should not run with the tank empty or without water flowing through it, so shut off the power or gas along with the water if the tank has drained.
Does a flood ruin a water heater?+
Floodwater rising up around a water heater from outside, rather than water leaking out of it, is the more serious scenario, since submerged controls, burners, or electrical components are not built to handle that exposure. A unit that only leaked from within and was never externally flooded is usually fine once the source of the leak is fixed.
Can a water heater cause flooding in the rest of the house?+
Yes, especially in a two-story home where the unit sits in an attic or upstairs closet. Water finds its way through flooring seams, light fixtures, and stairwells to lower levels, which is how a tank failure on an upper floor can end up soaking a ceiling and room below it as well as the immediate area.
What causes a water heater to explode?+
A true explosion is rare and almost always tied to the temperature-and-pressure relief valve failing to vent while pressure and temperature keep climbing, sometimes from a runaway thermostat. That combination is exactly what the relief valve exists to prevent, which is why a valve that is stuck, painted over, or plumbed incorrectly is a genuine safety issue, not a minor drip to ignore.